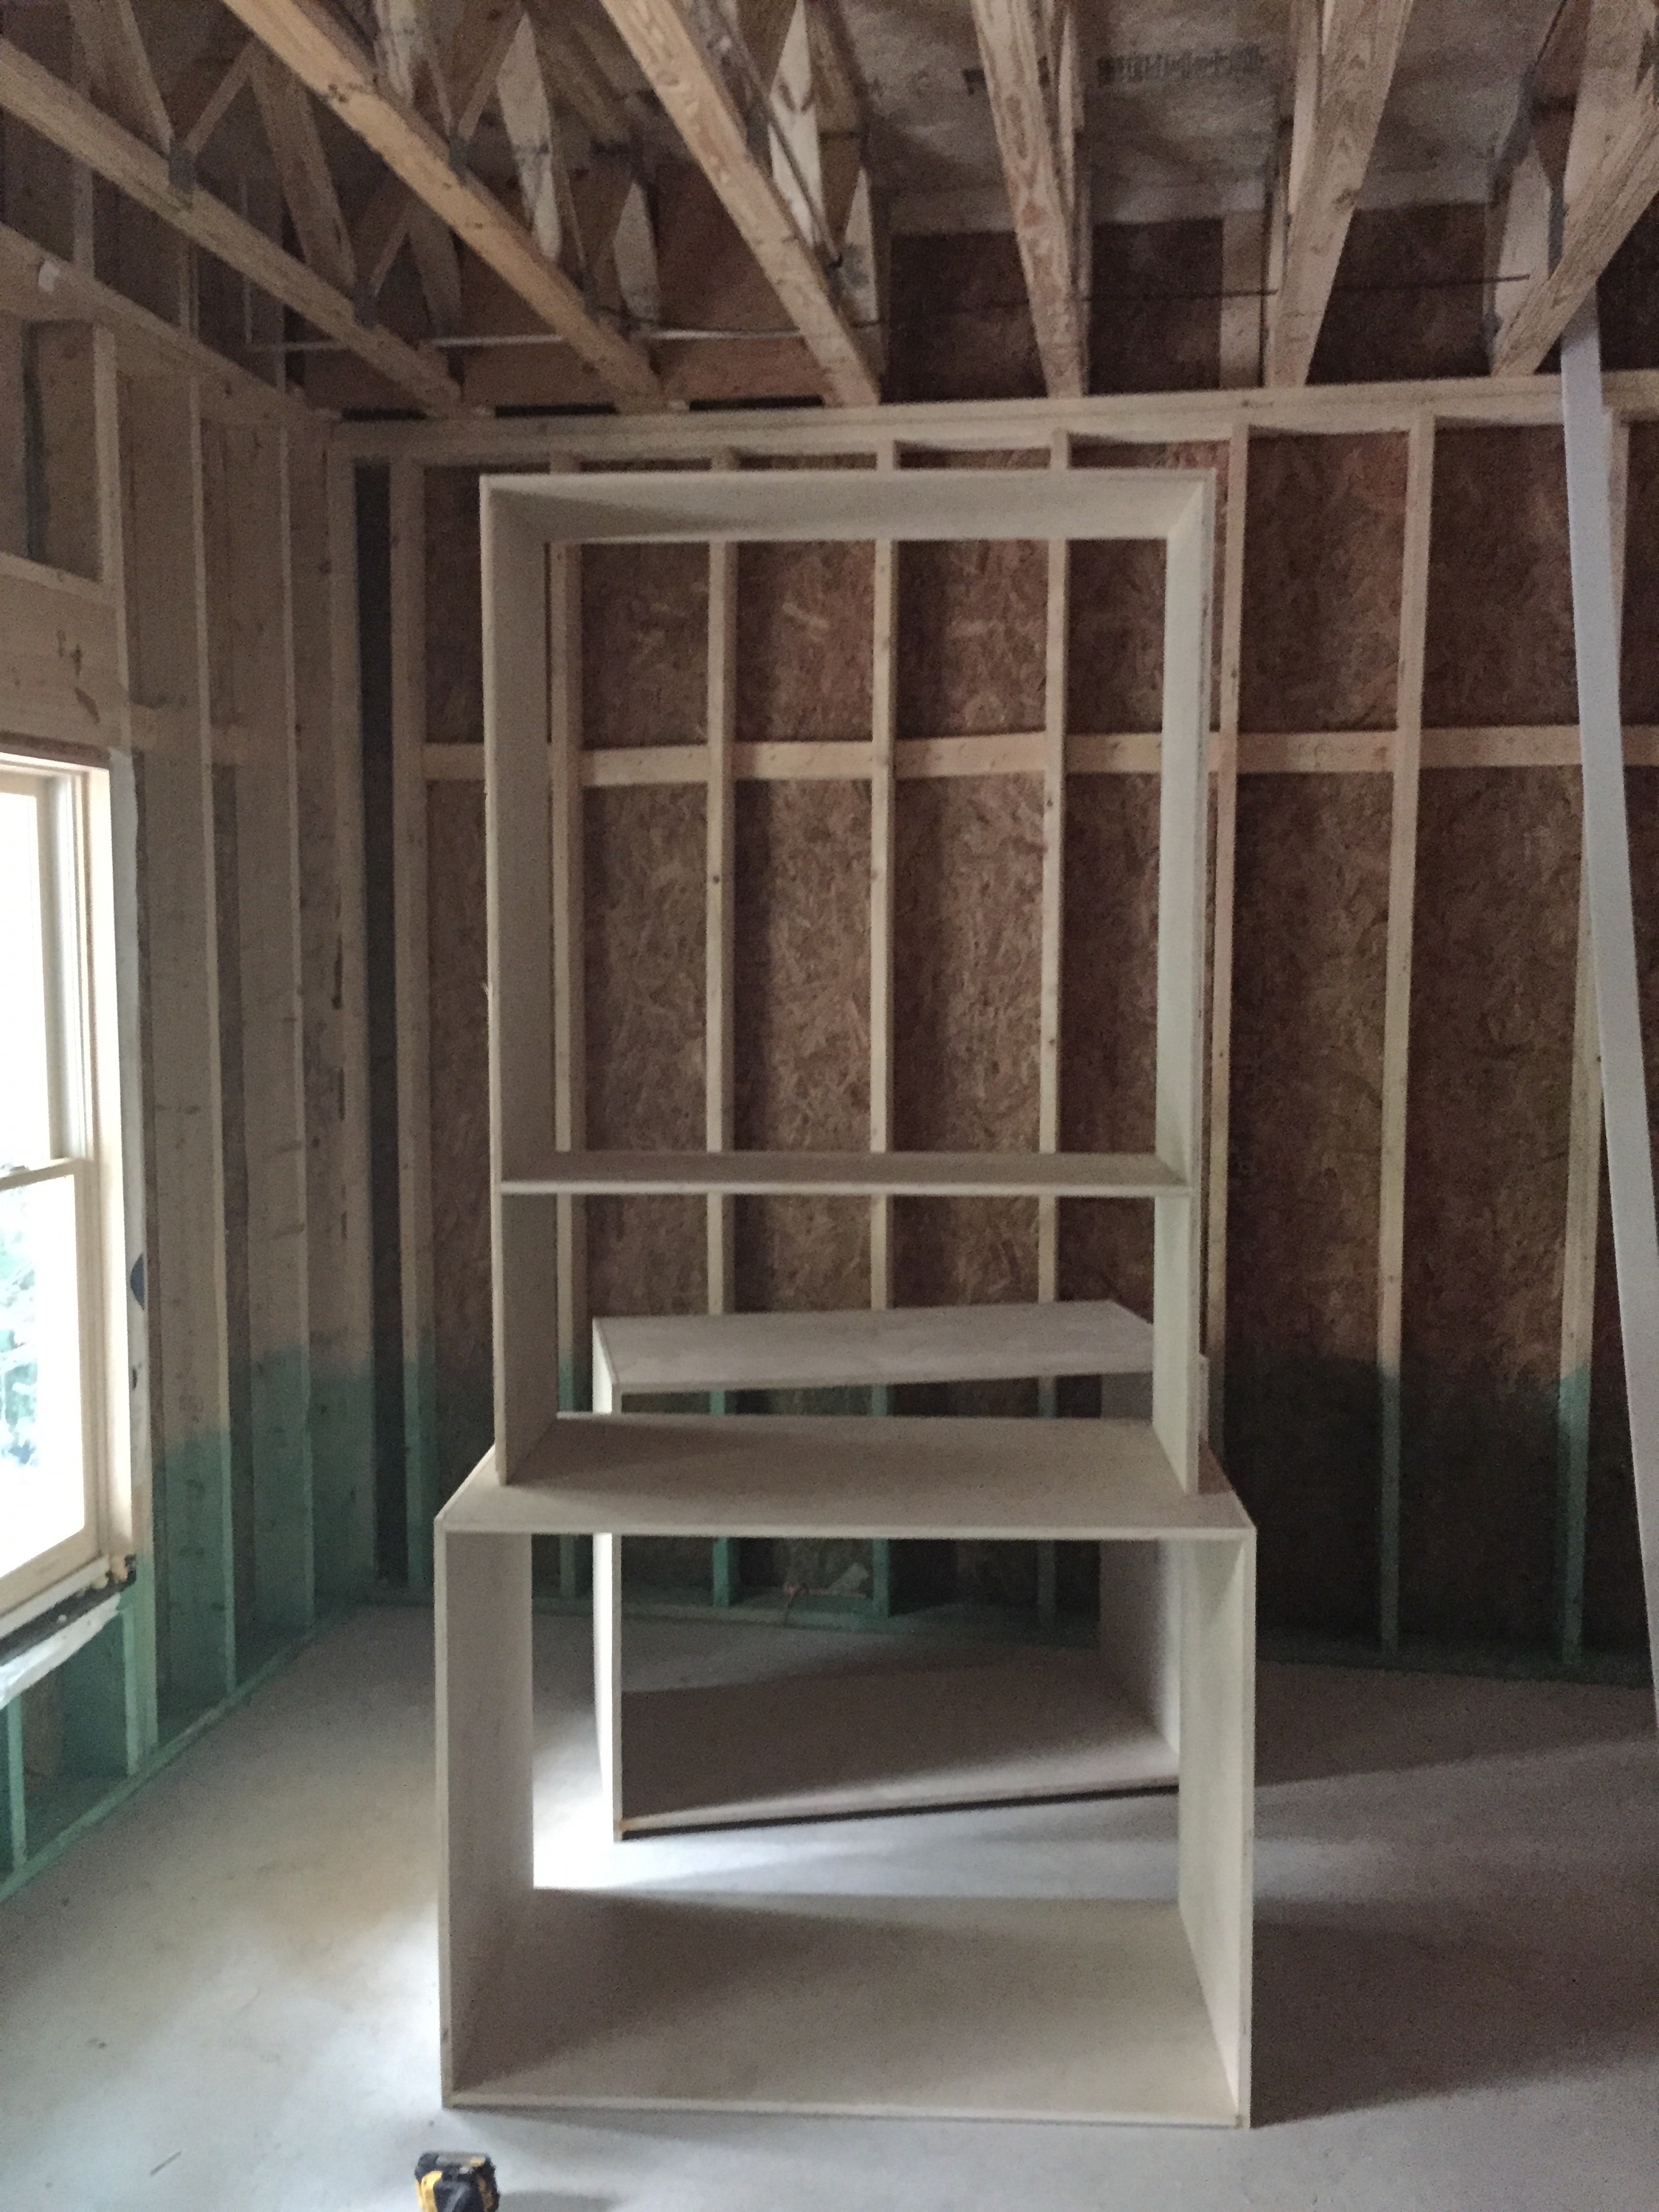
I’m sure I’ve mentioned it before but I’m a hobbiest carpenter and have committed to building the built-ins and the fireplace mantle. For the last several weeks I’ve been spending the evenings over there and it’s coming along slowly. I am enjoying putting my stamp on it, and I’m looking forward to seeing the finished product in.
The floors are going in this week and cabinets next. We’re back to moving quickly!
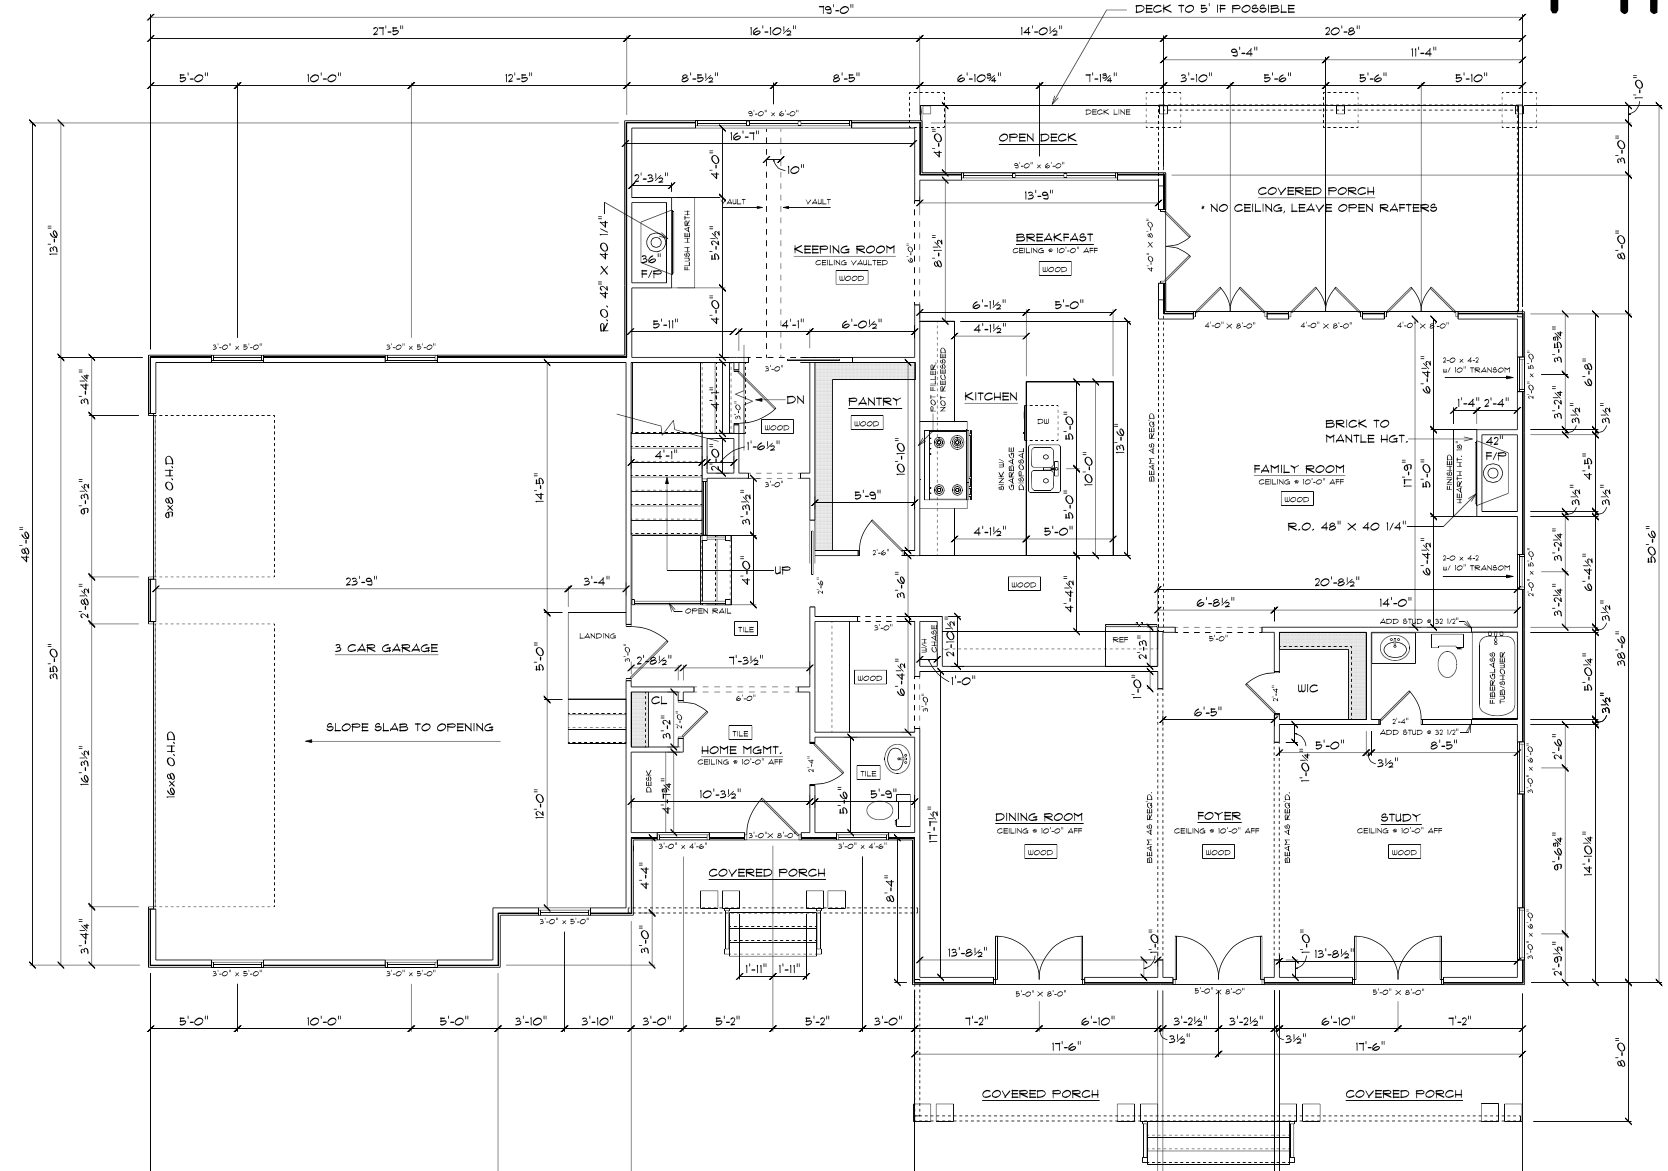
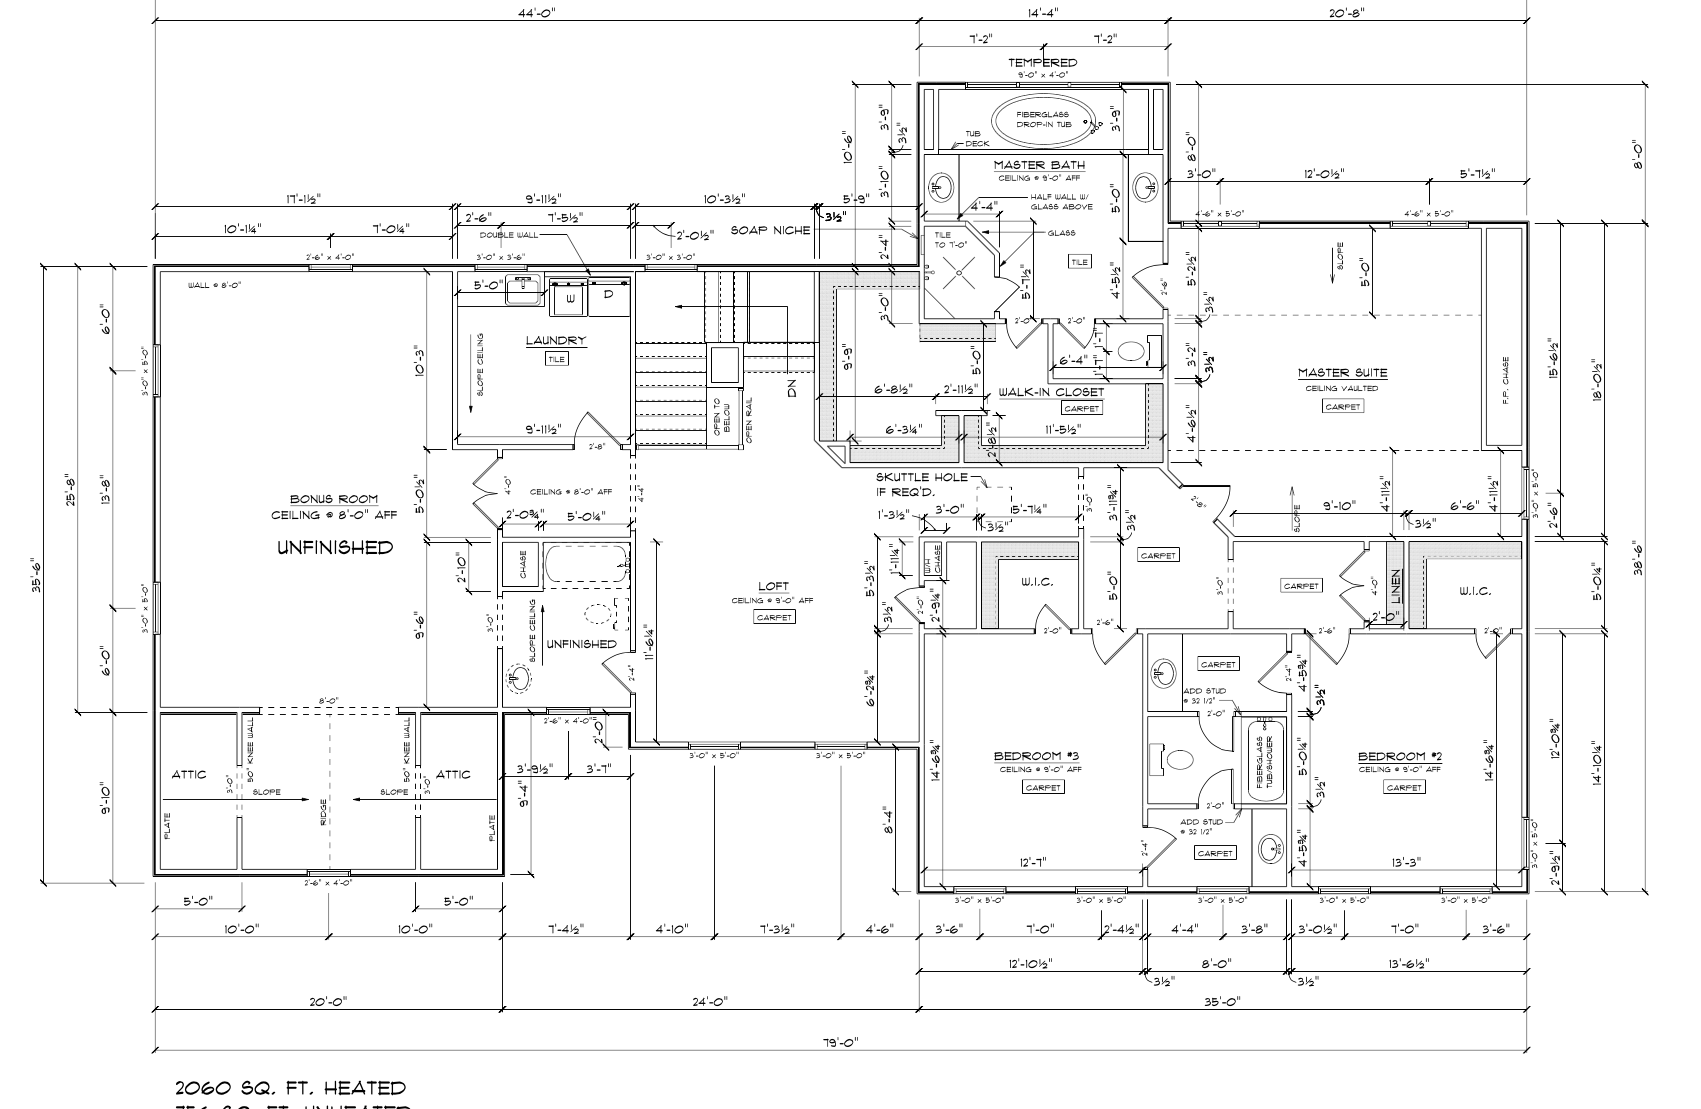
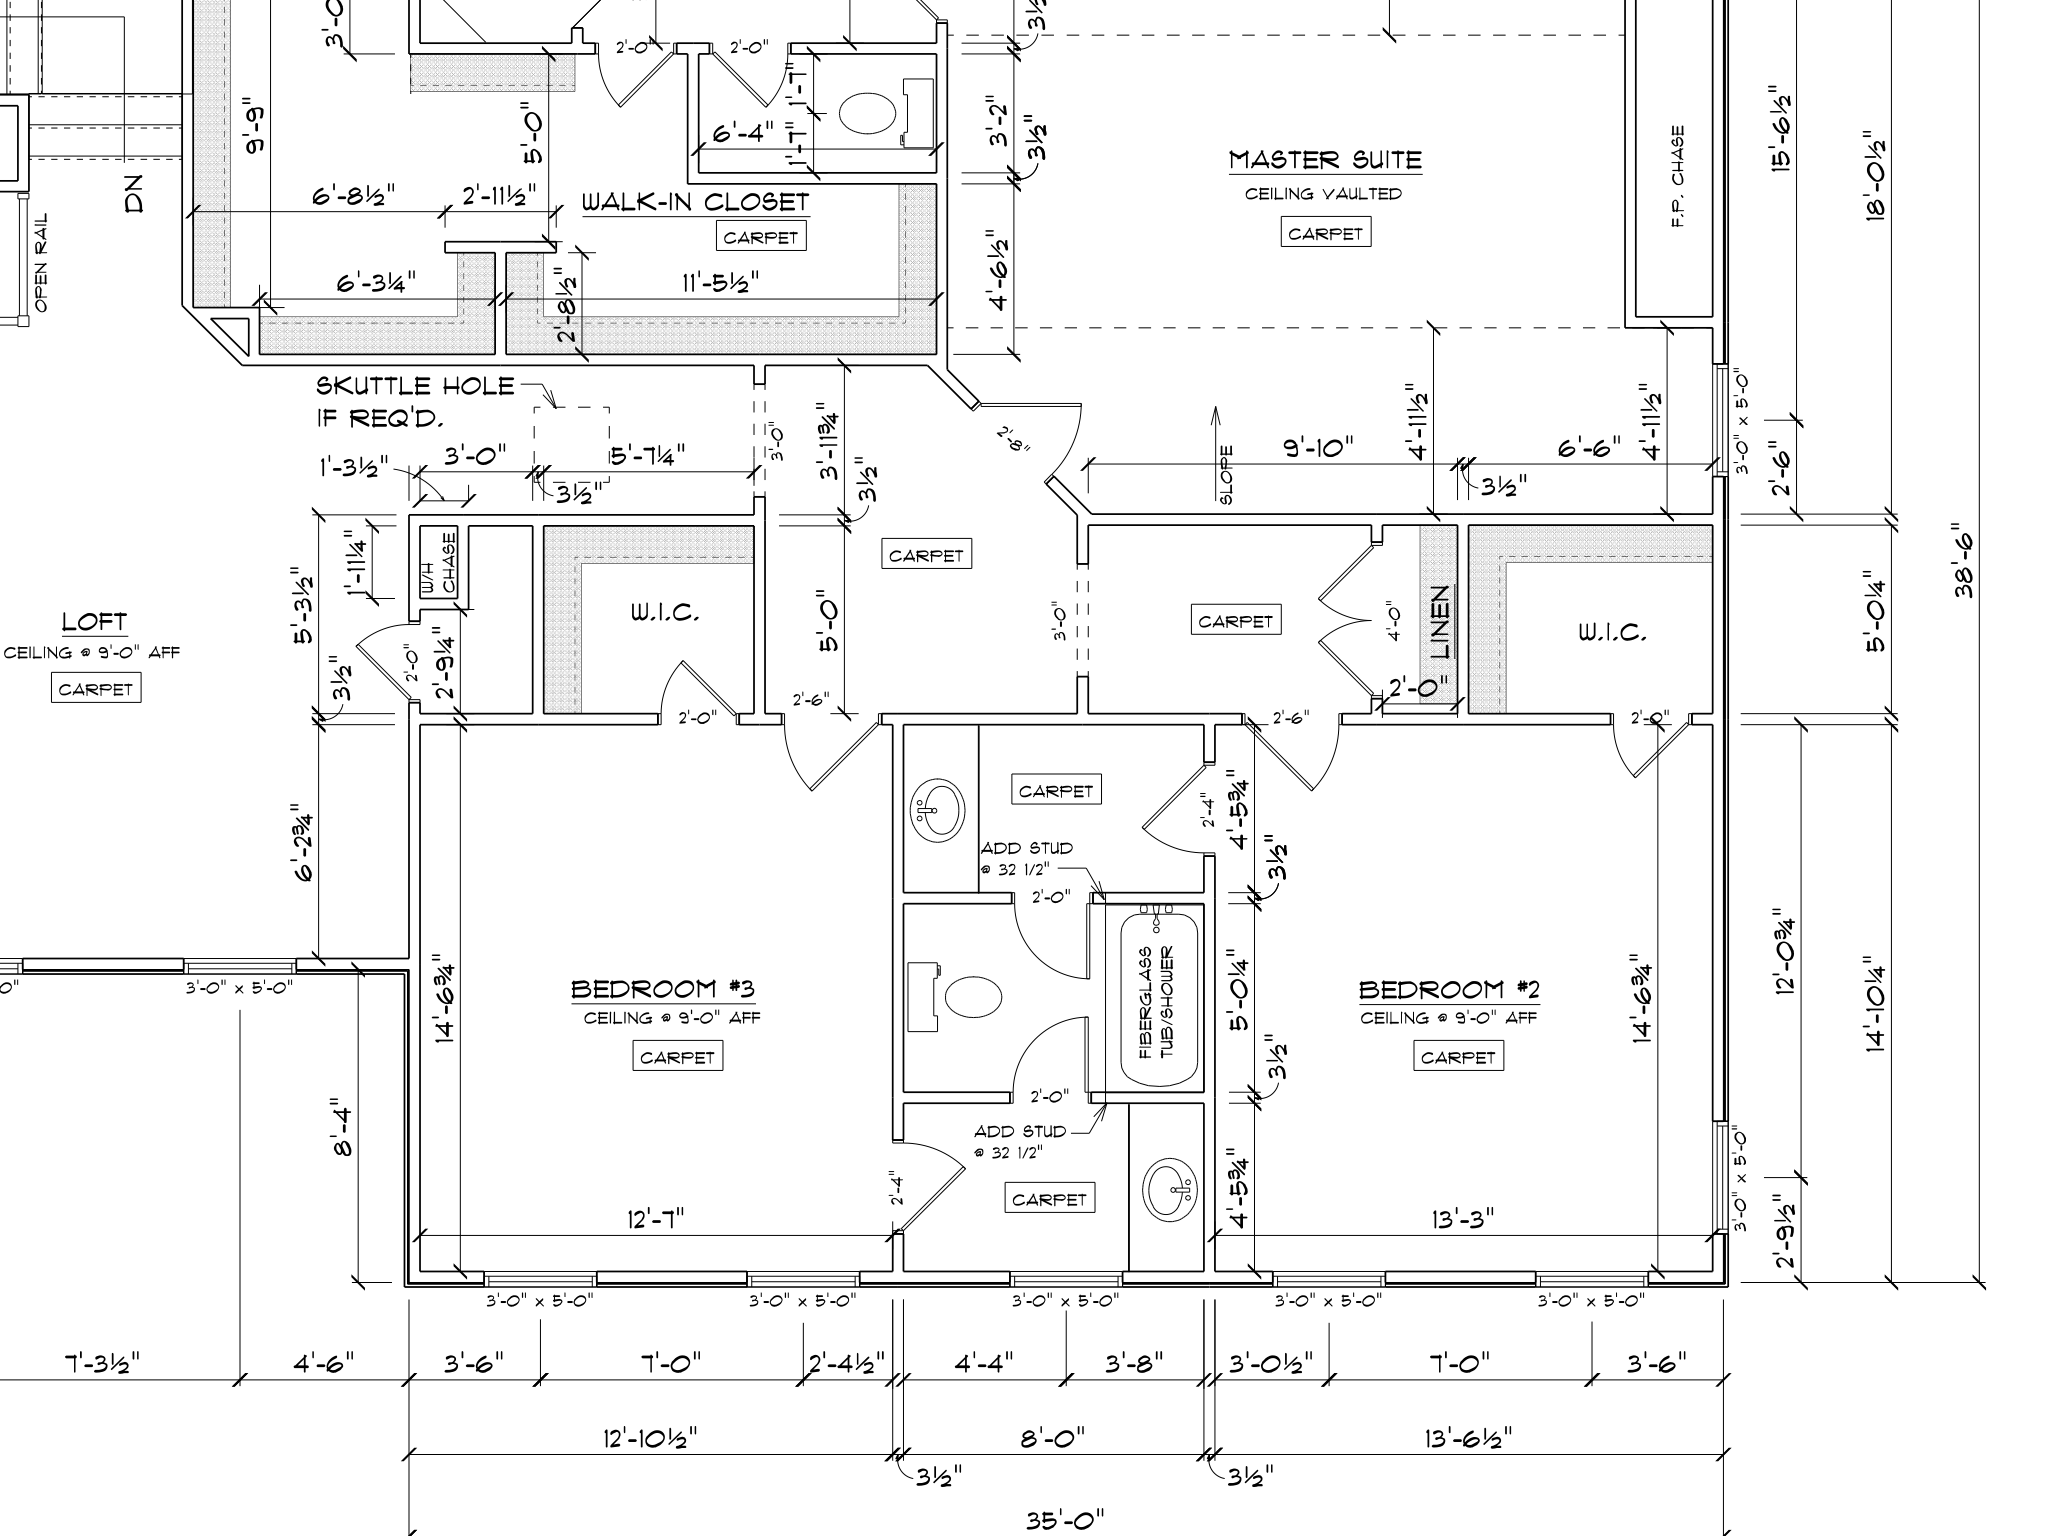
One the great folks over at Houzz/GardenWeb asked me about the floor plan today, so I thought I’d post. It was inspired by a local builder’s neighborhood, but we’ve made several changes to make it ours.
It’s a great house, and we’re having a great time building it. The sheetrock folks were there tonight when I left (about 8pm), and I think they were sanding the last coat. We’re ready for priming and floors!
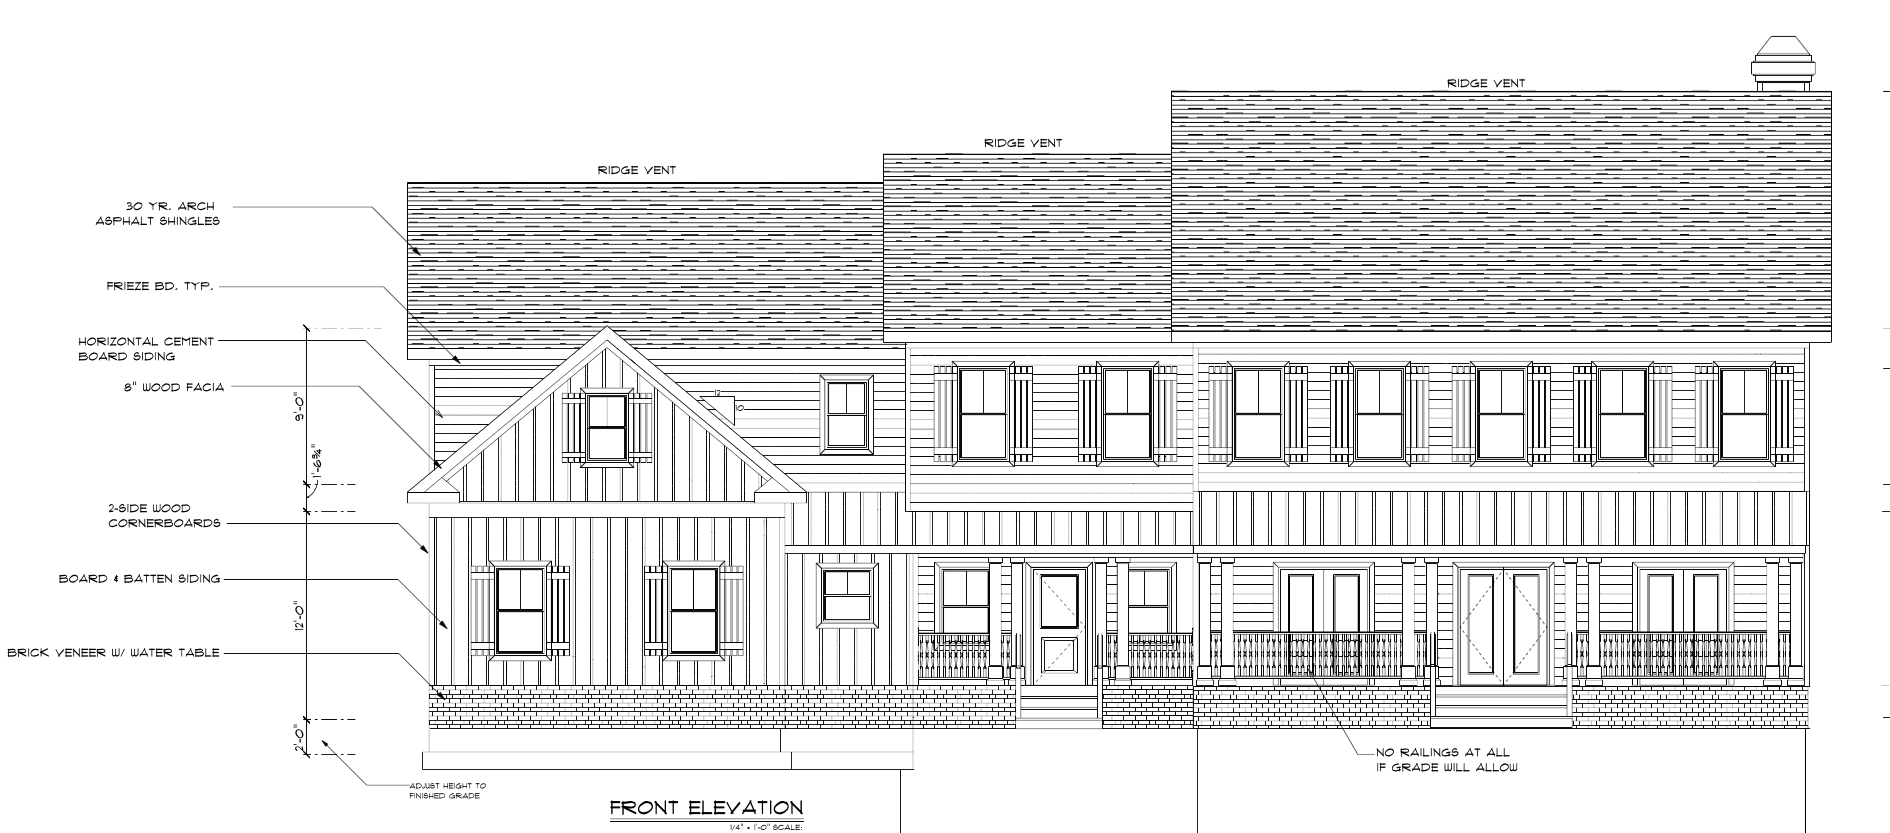
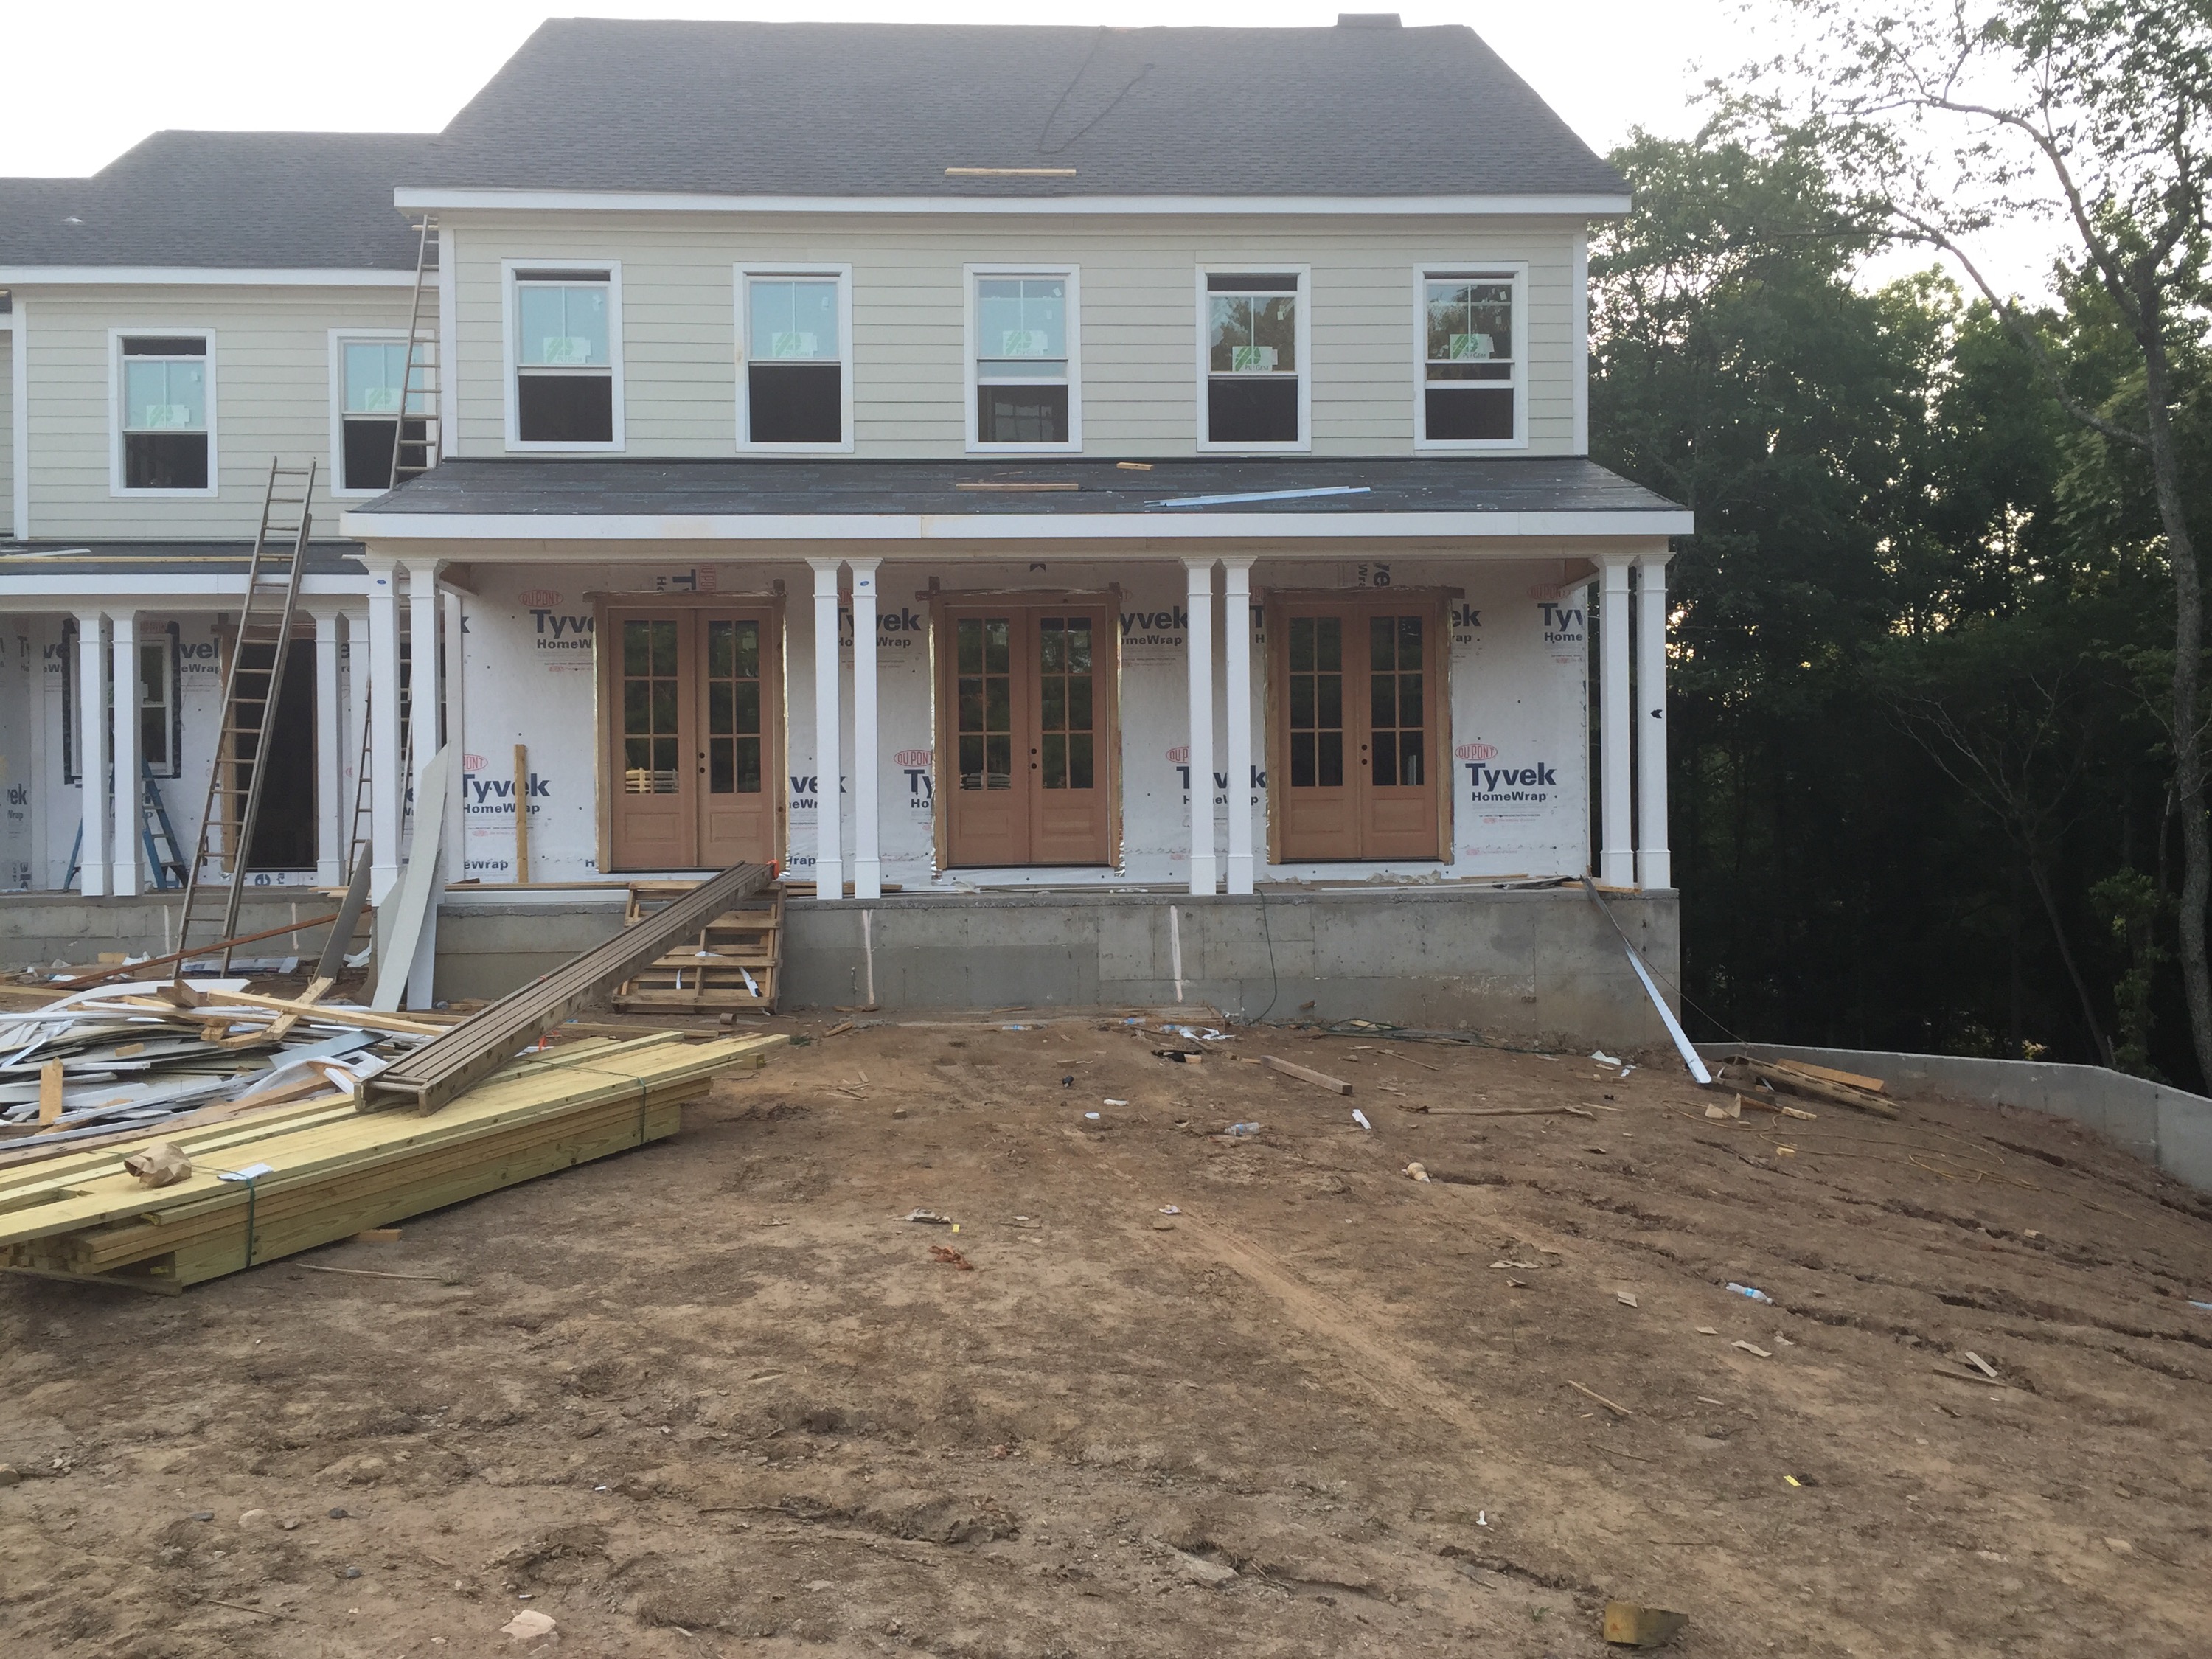
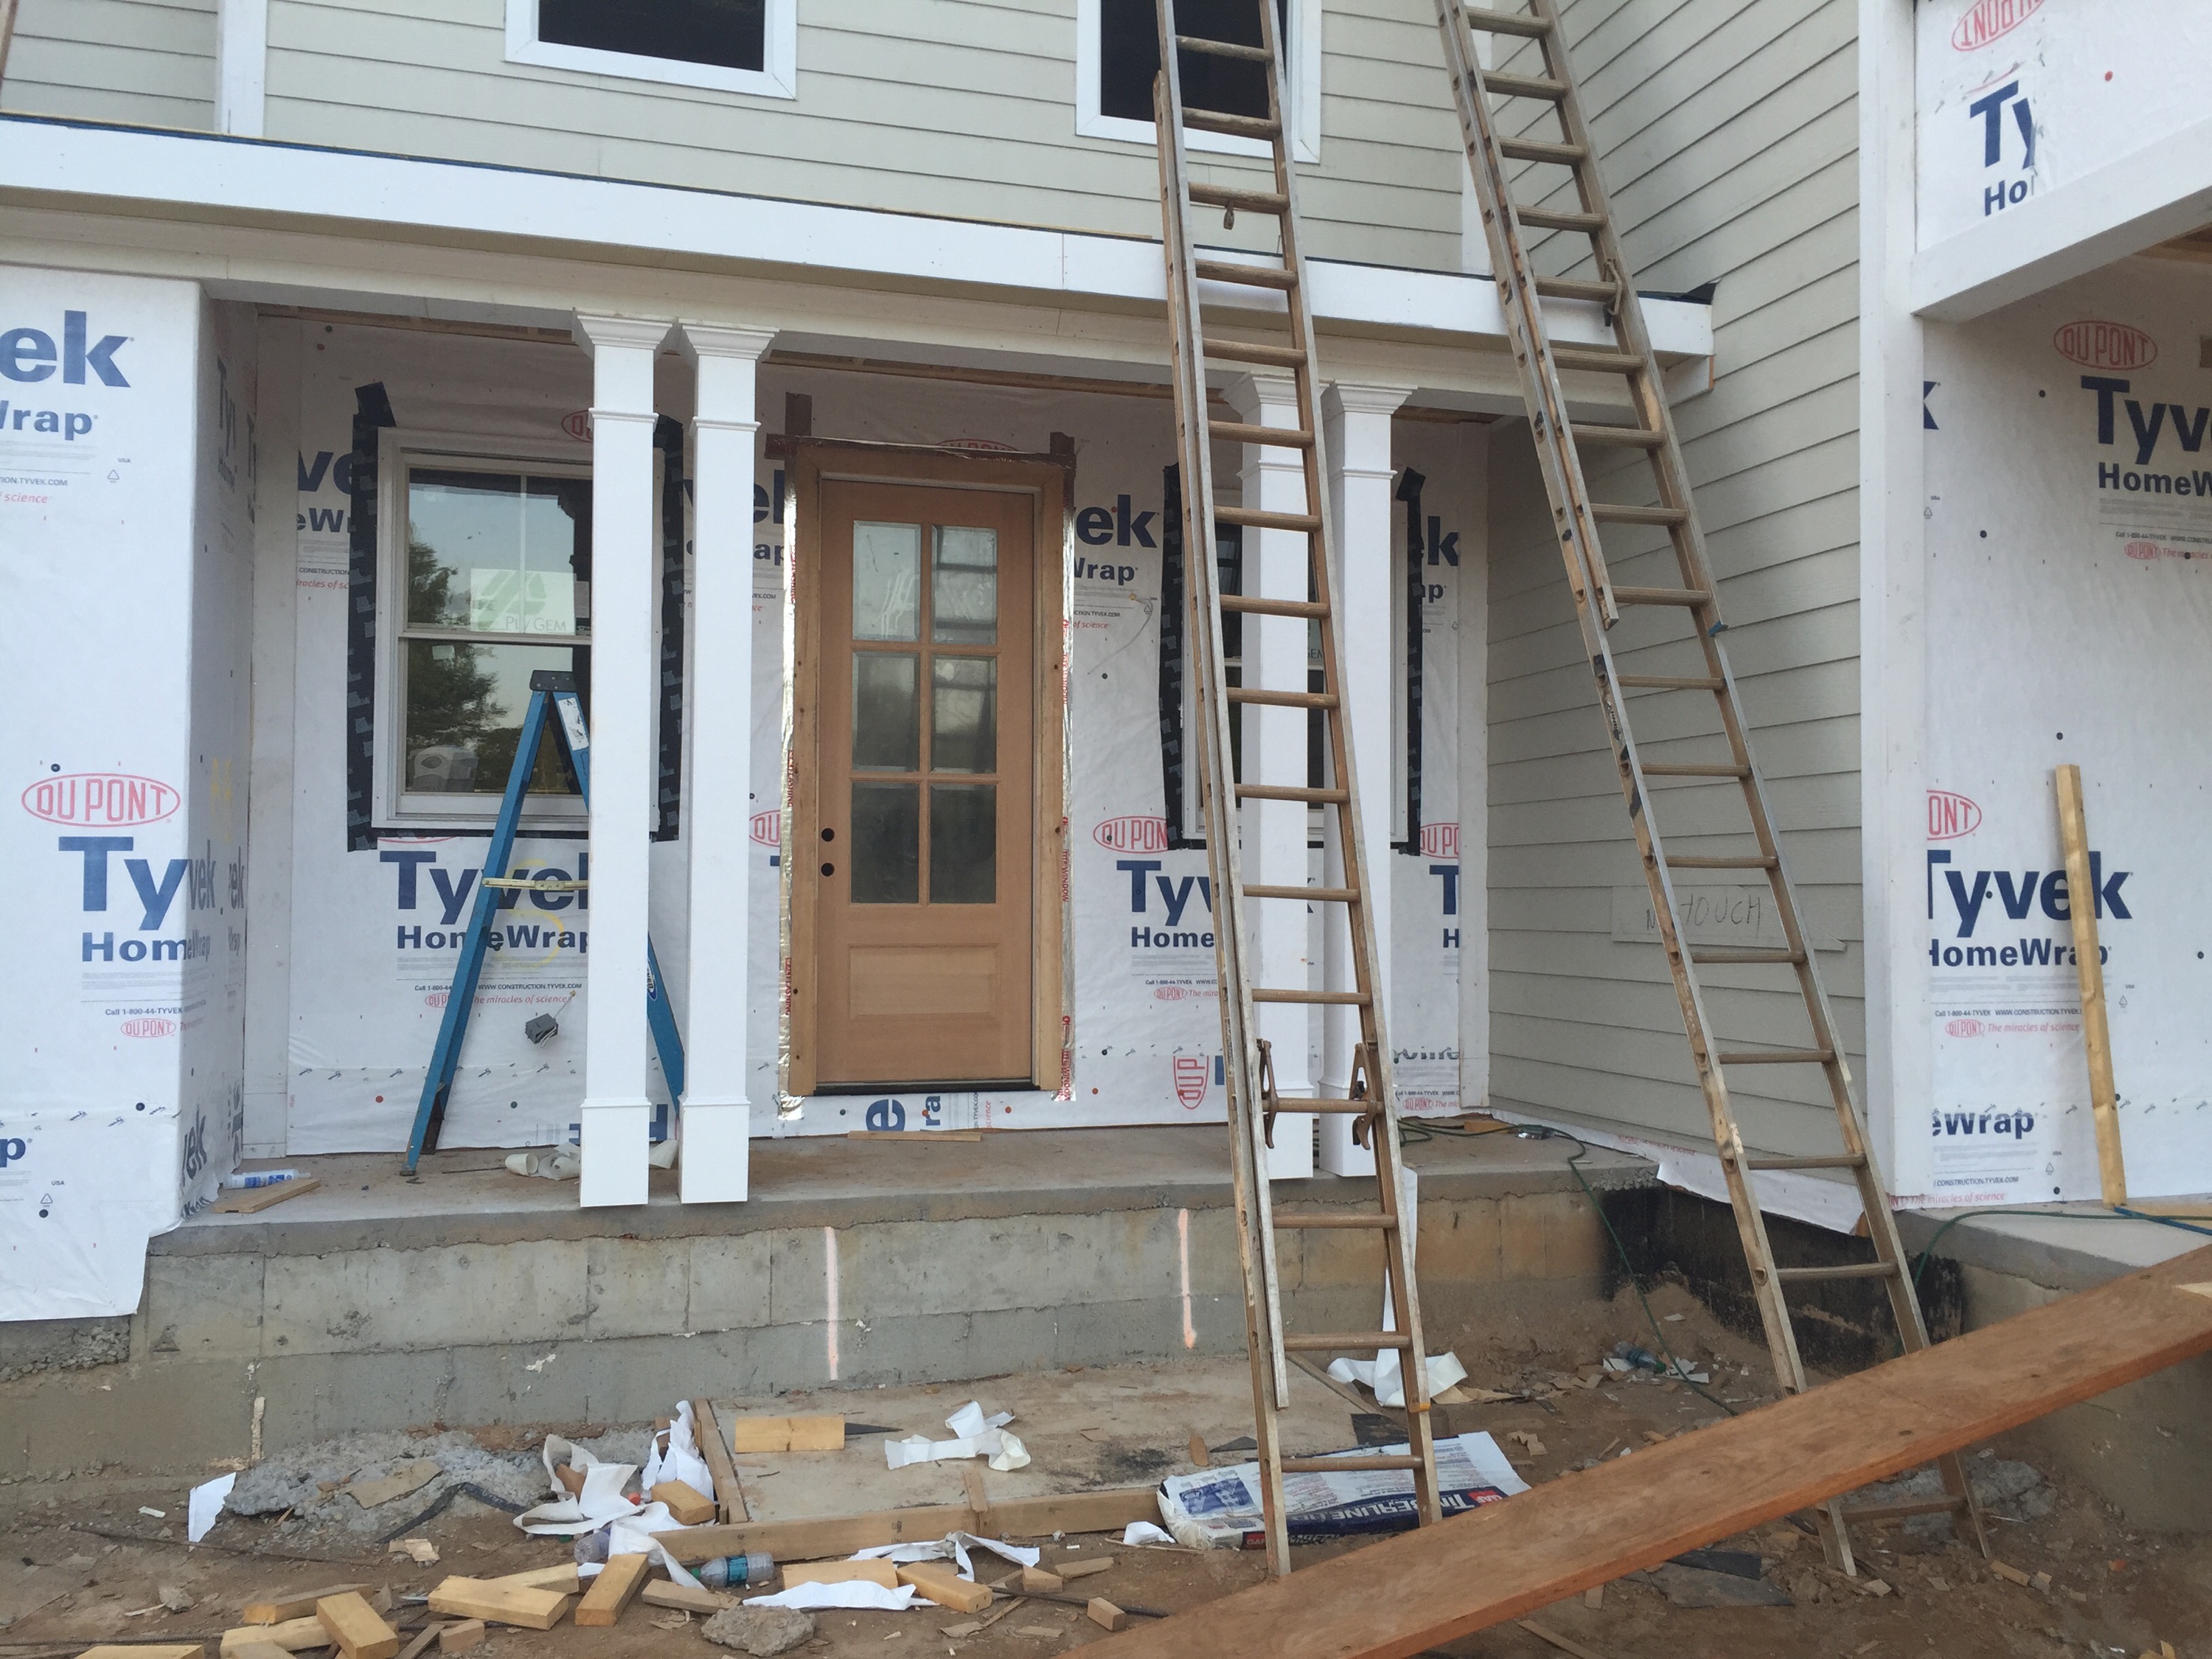
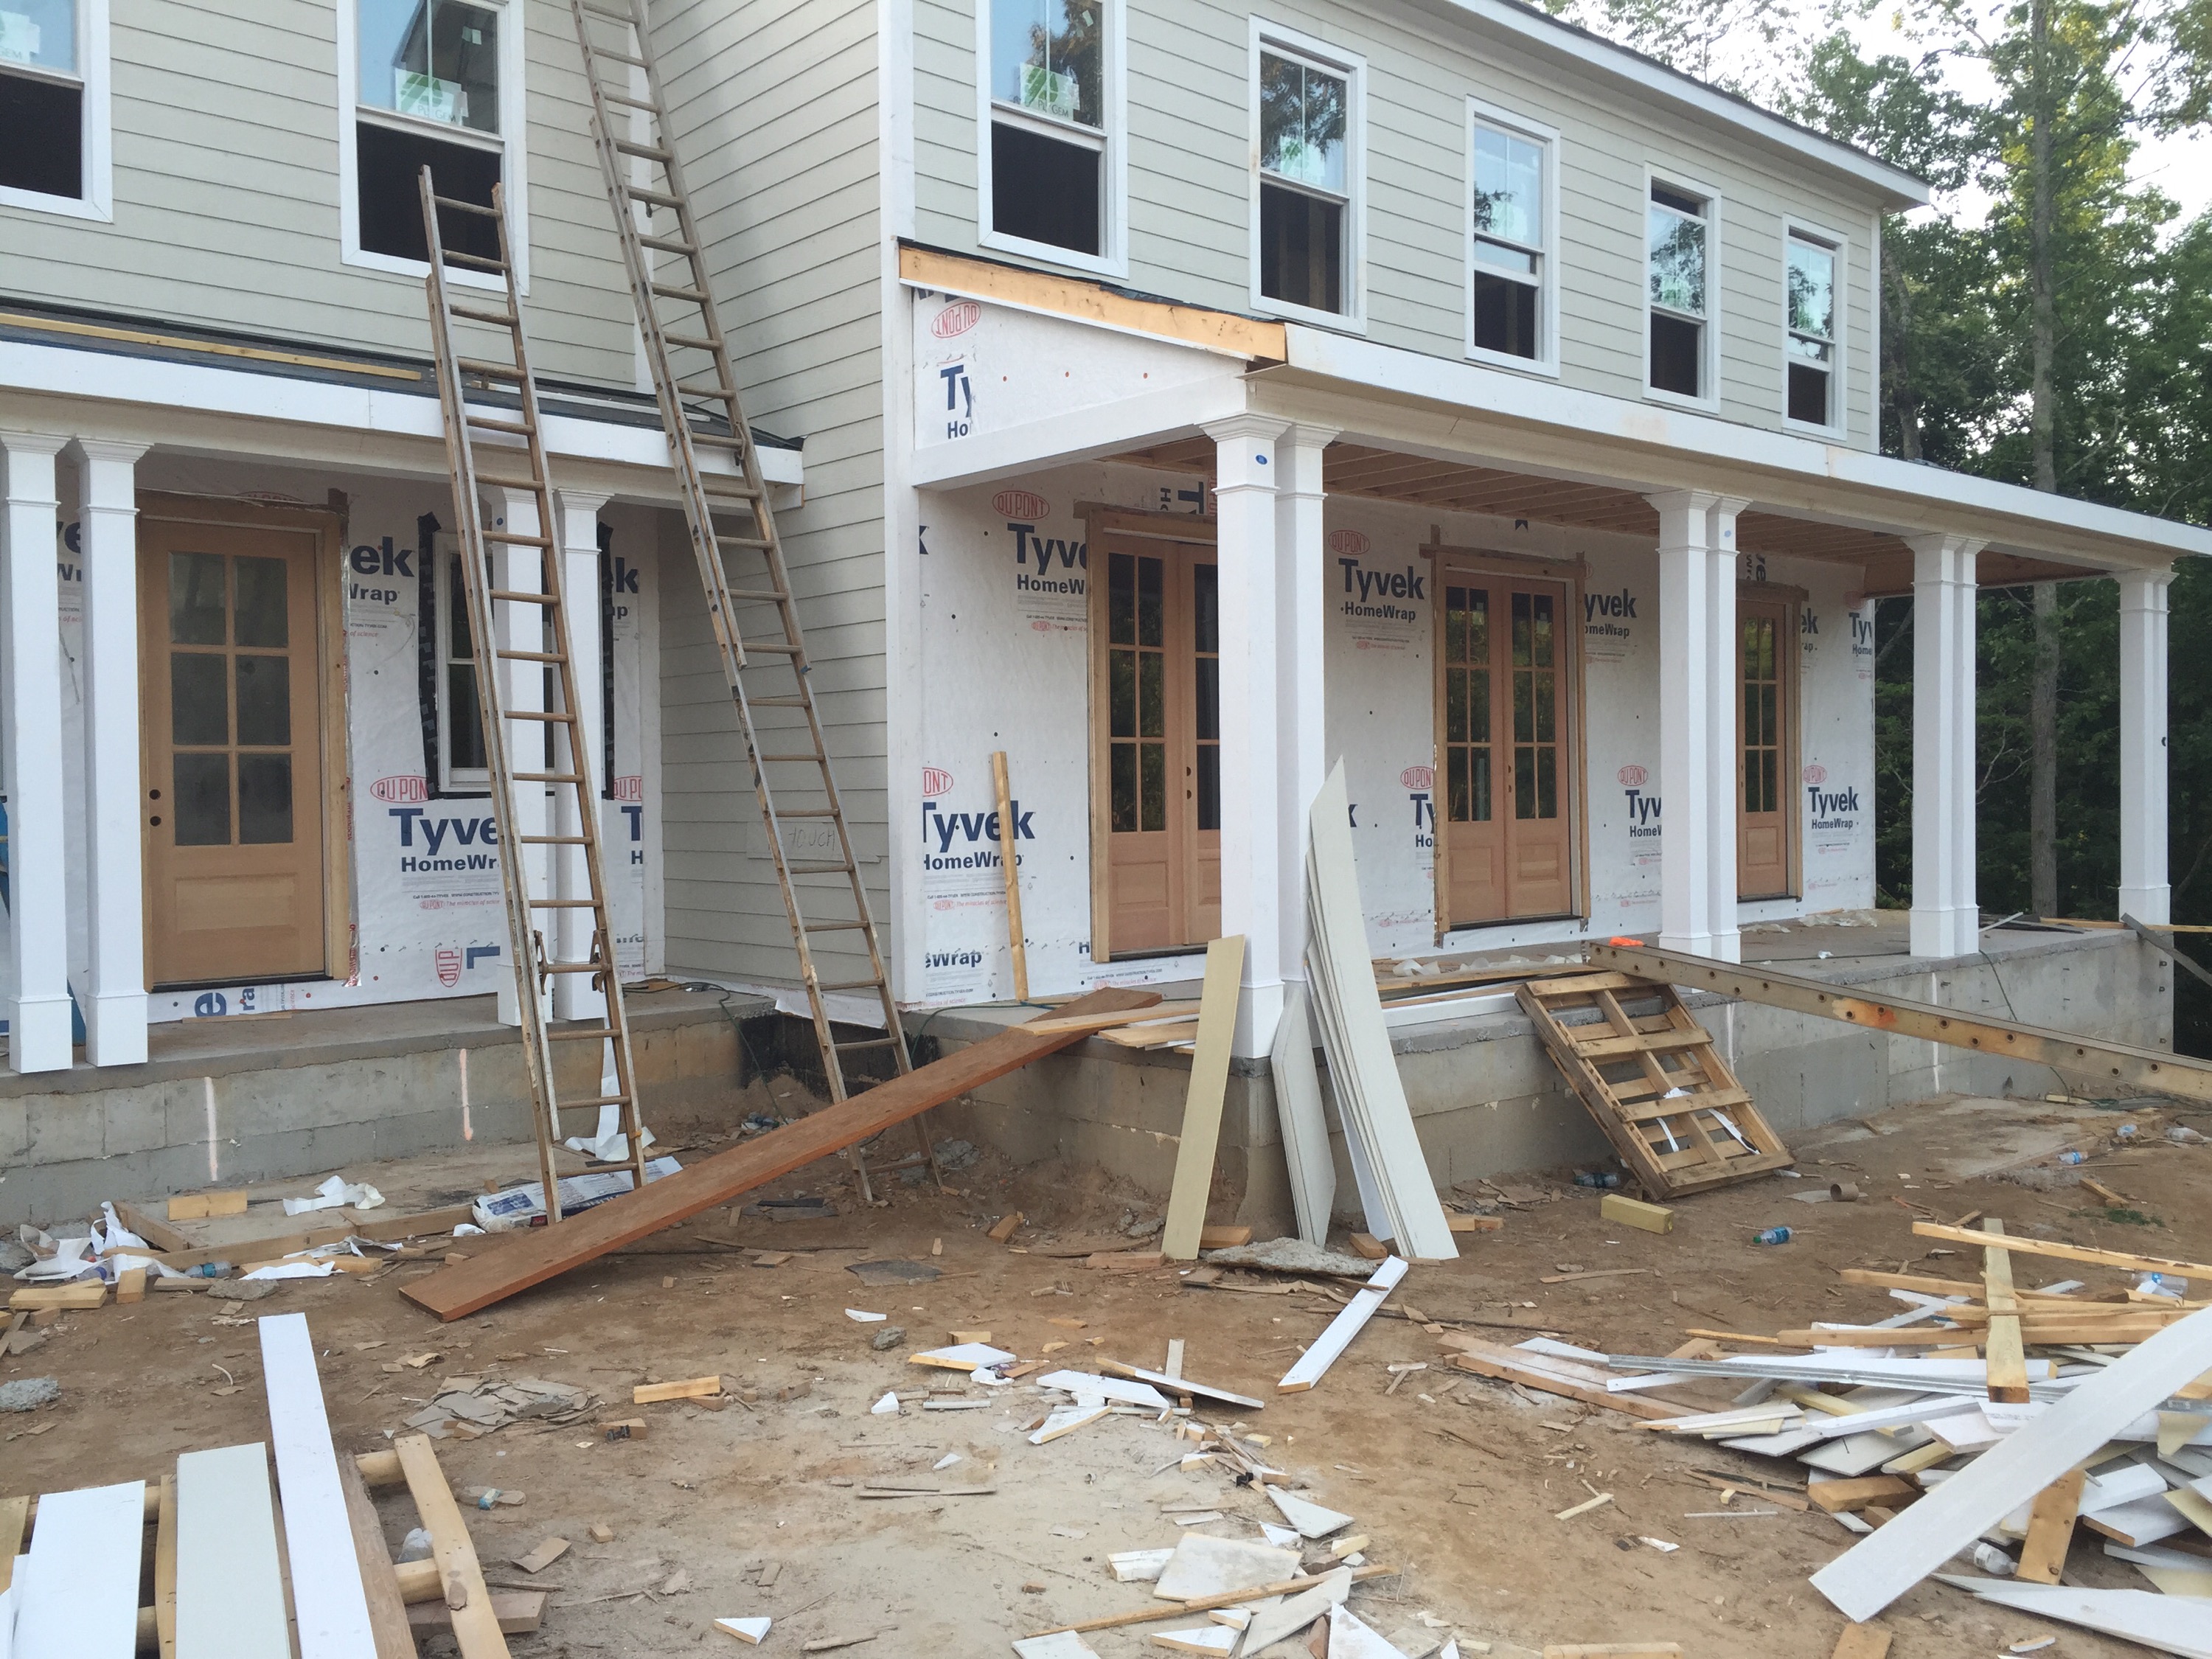
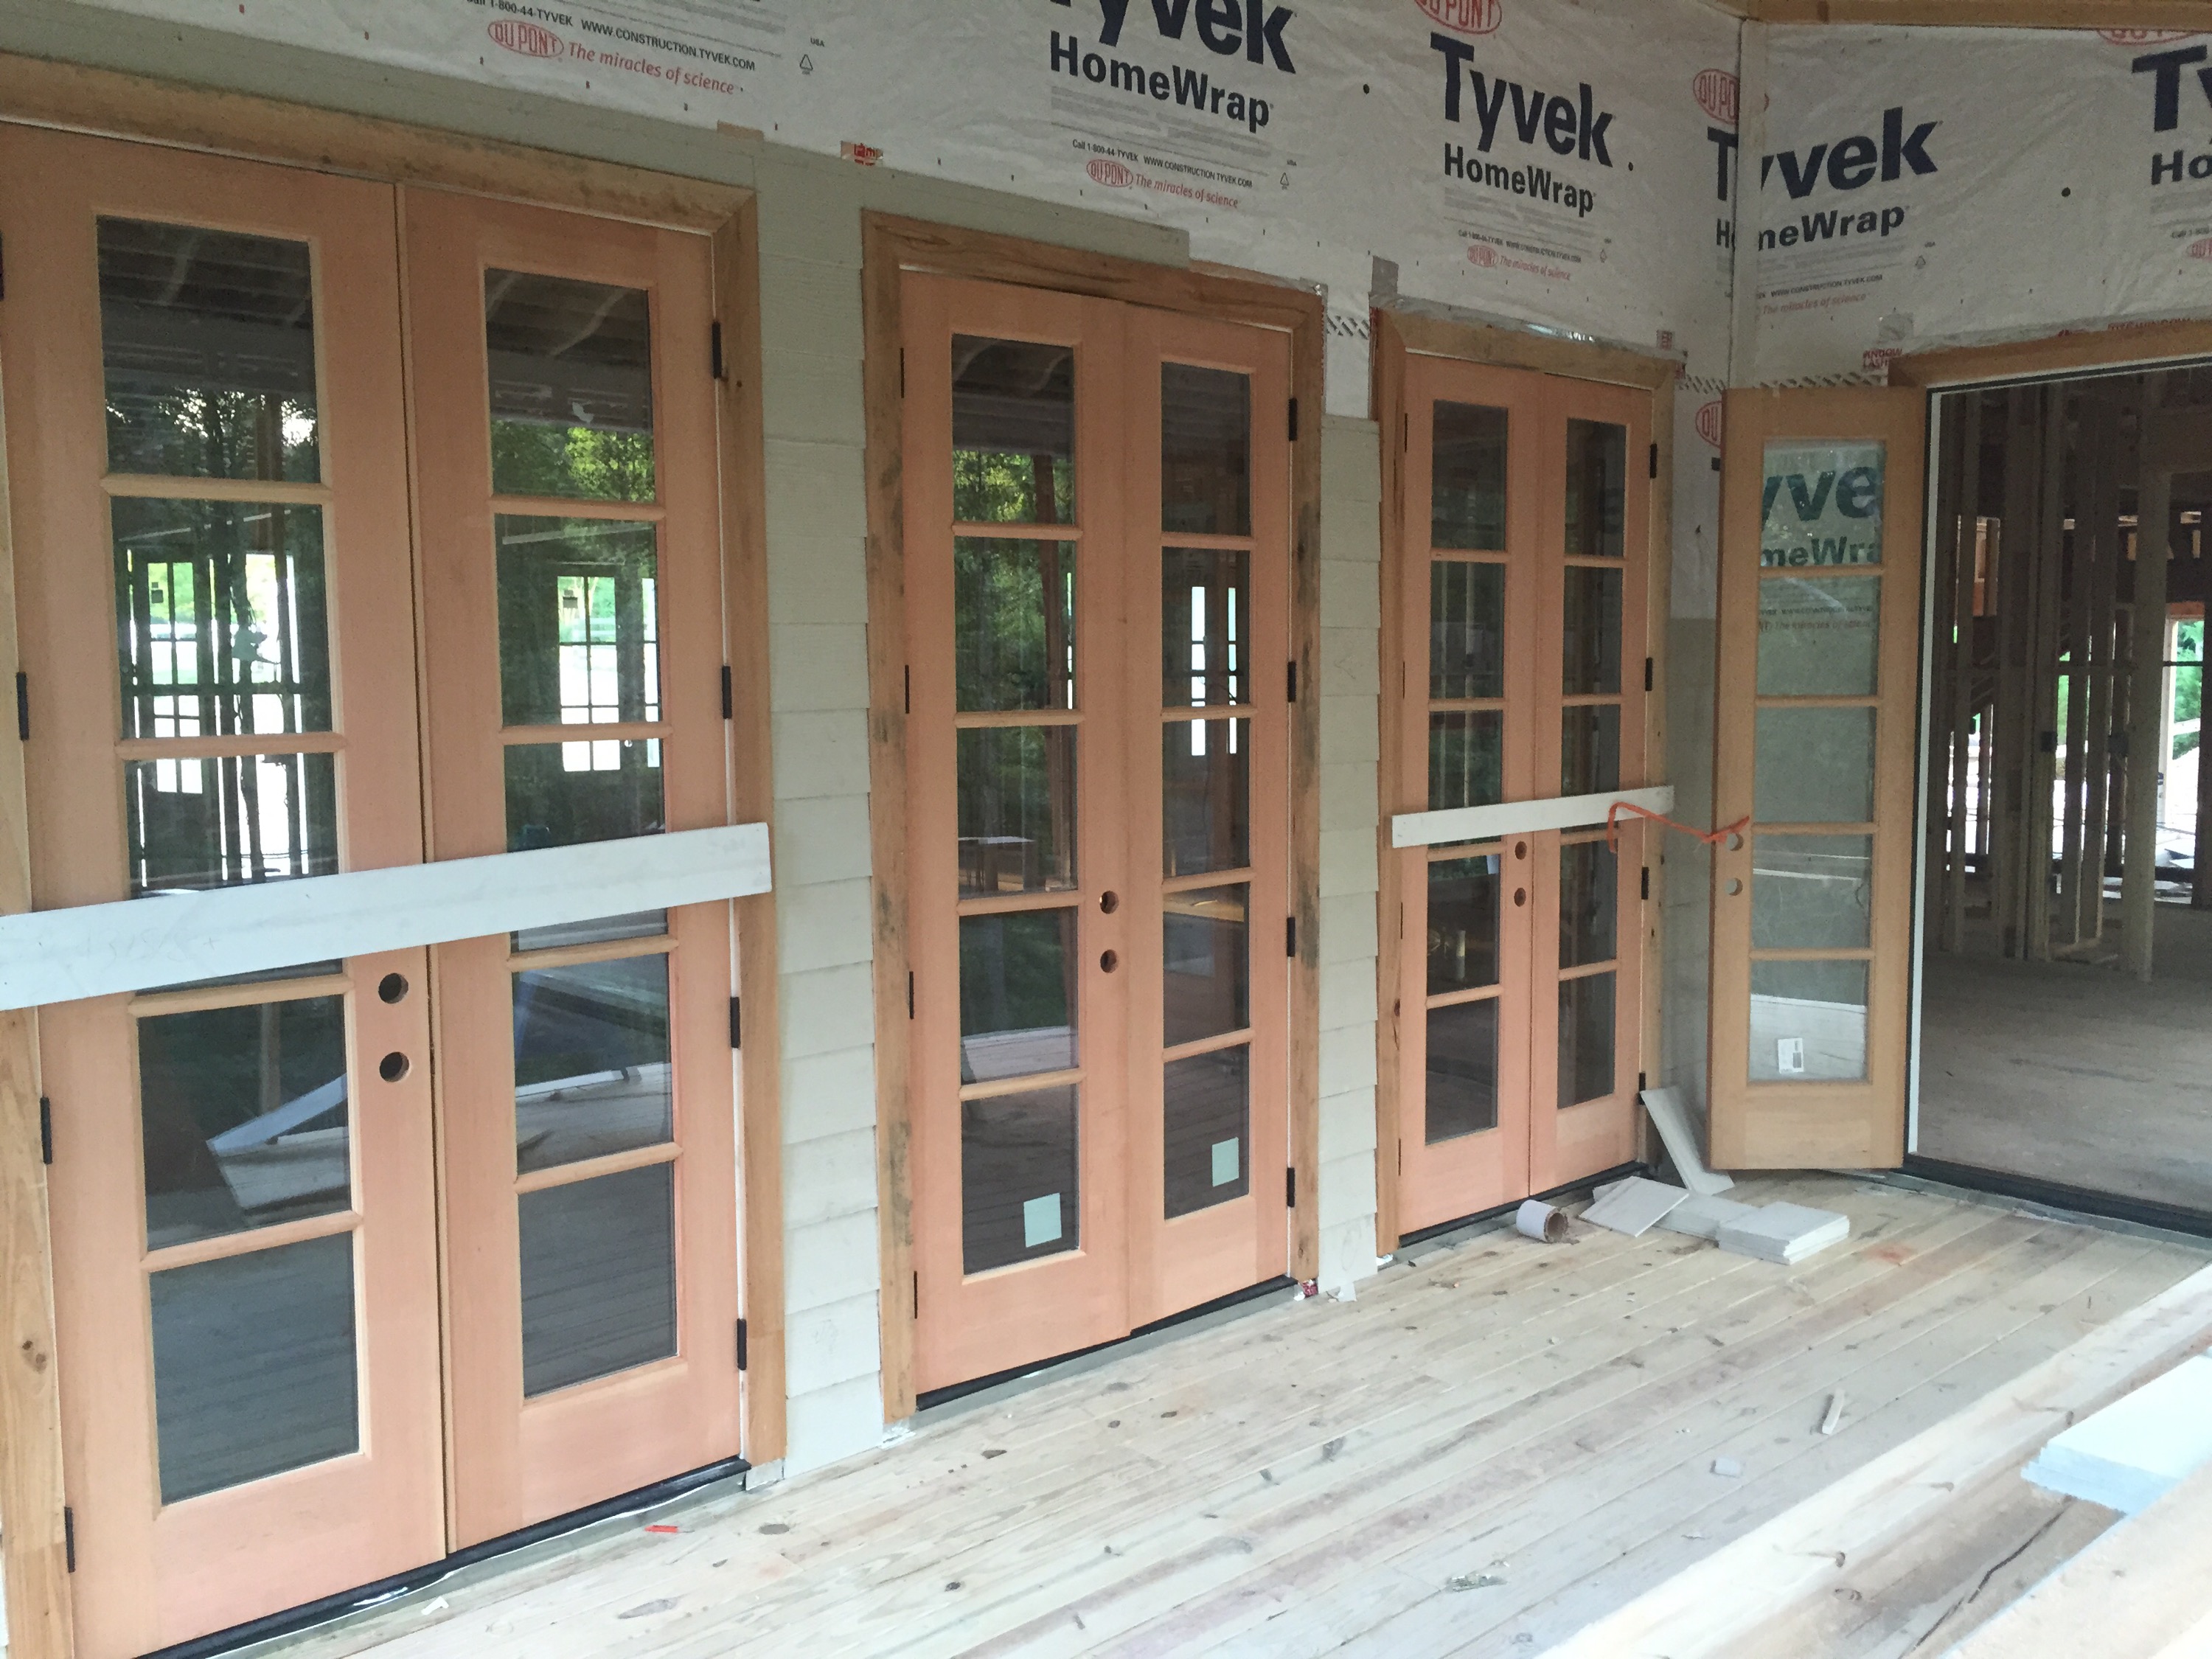
There have been various things we’ve been looking forward to with our house. None for longer than the exterior doors. I’ve had them in my head and chosen for about 2 years. They went in today, and I’m thrilled. We couldn’t be happier with our 10ft ceilings that make room for the 8ft doors. They’re all solid wood, but they’re under cover, so they should be good for years after I stain and finish them.
Main part of the house. 3 5x8s “Friends Porch door”All four front doors
We’ve mentioned before that one of the things important to us was to get our costs as known as possible. Our Out of Pocket costs page is detailing all of the “extras”, but many were expected–just items that we’re paying for directly.
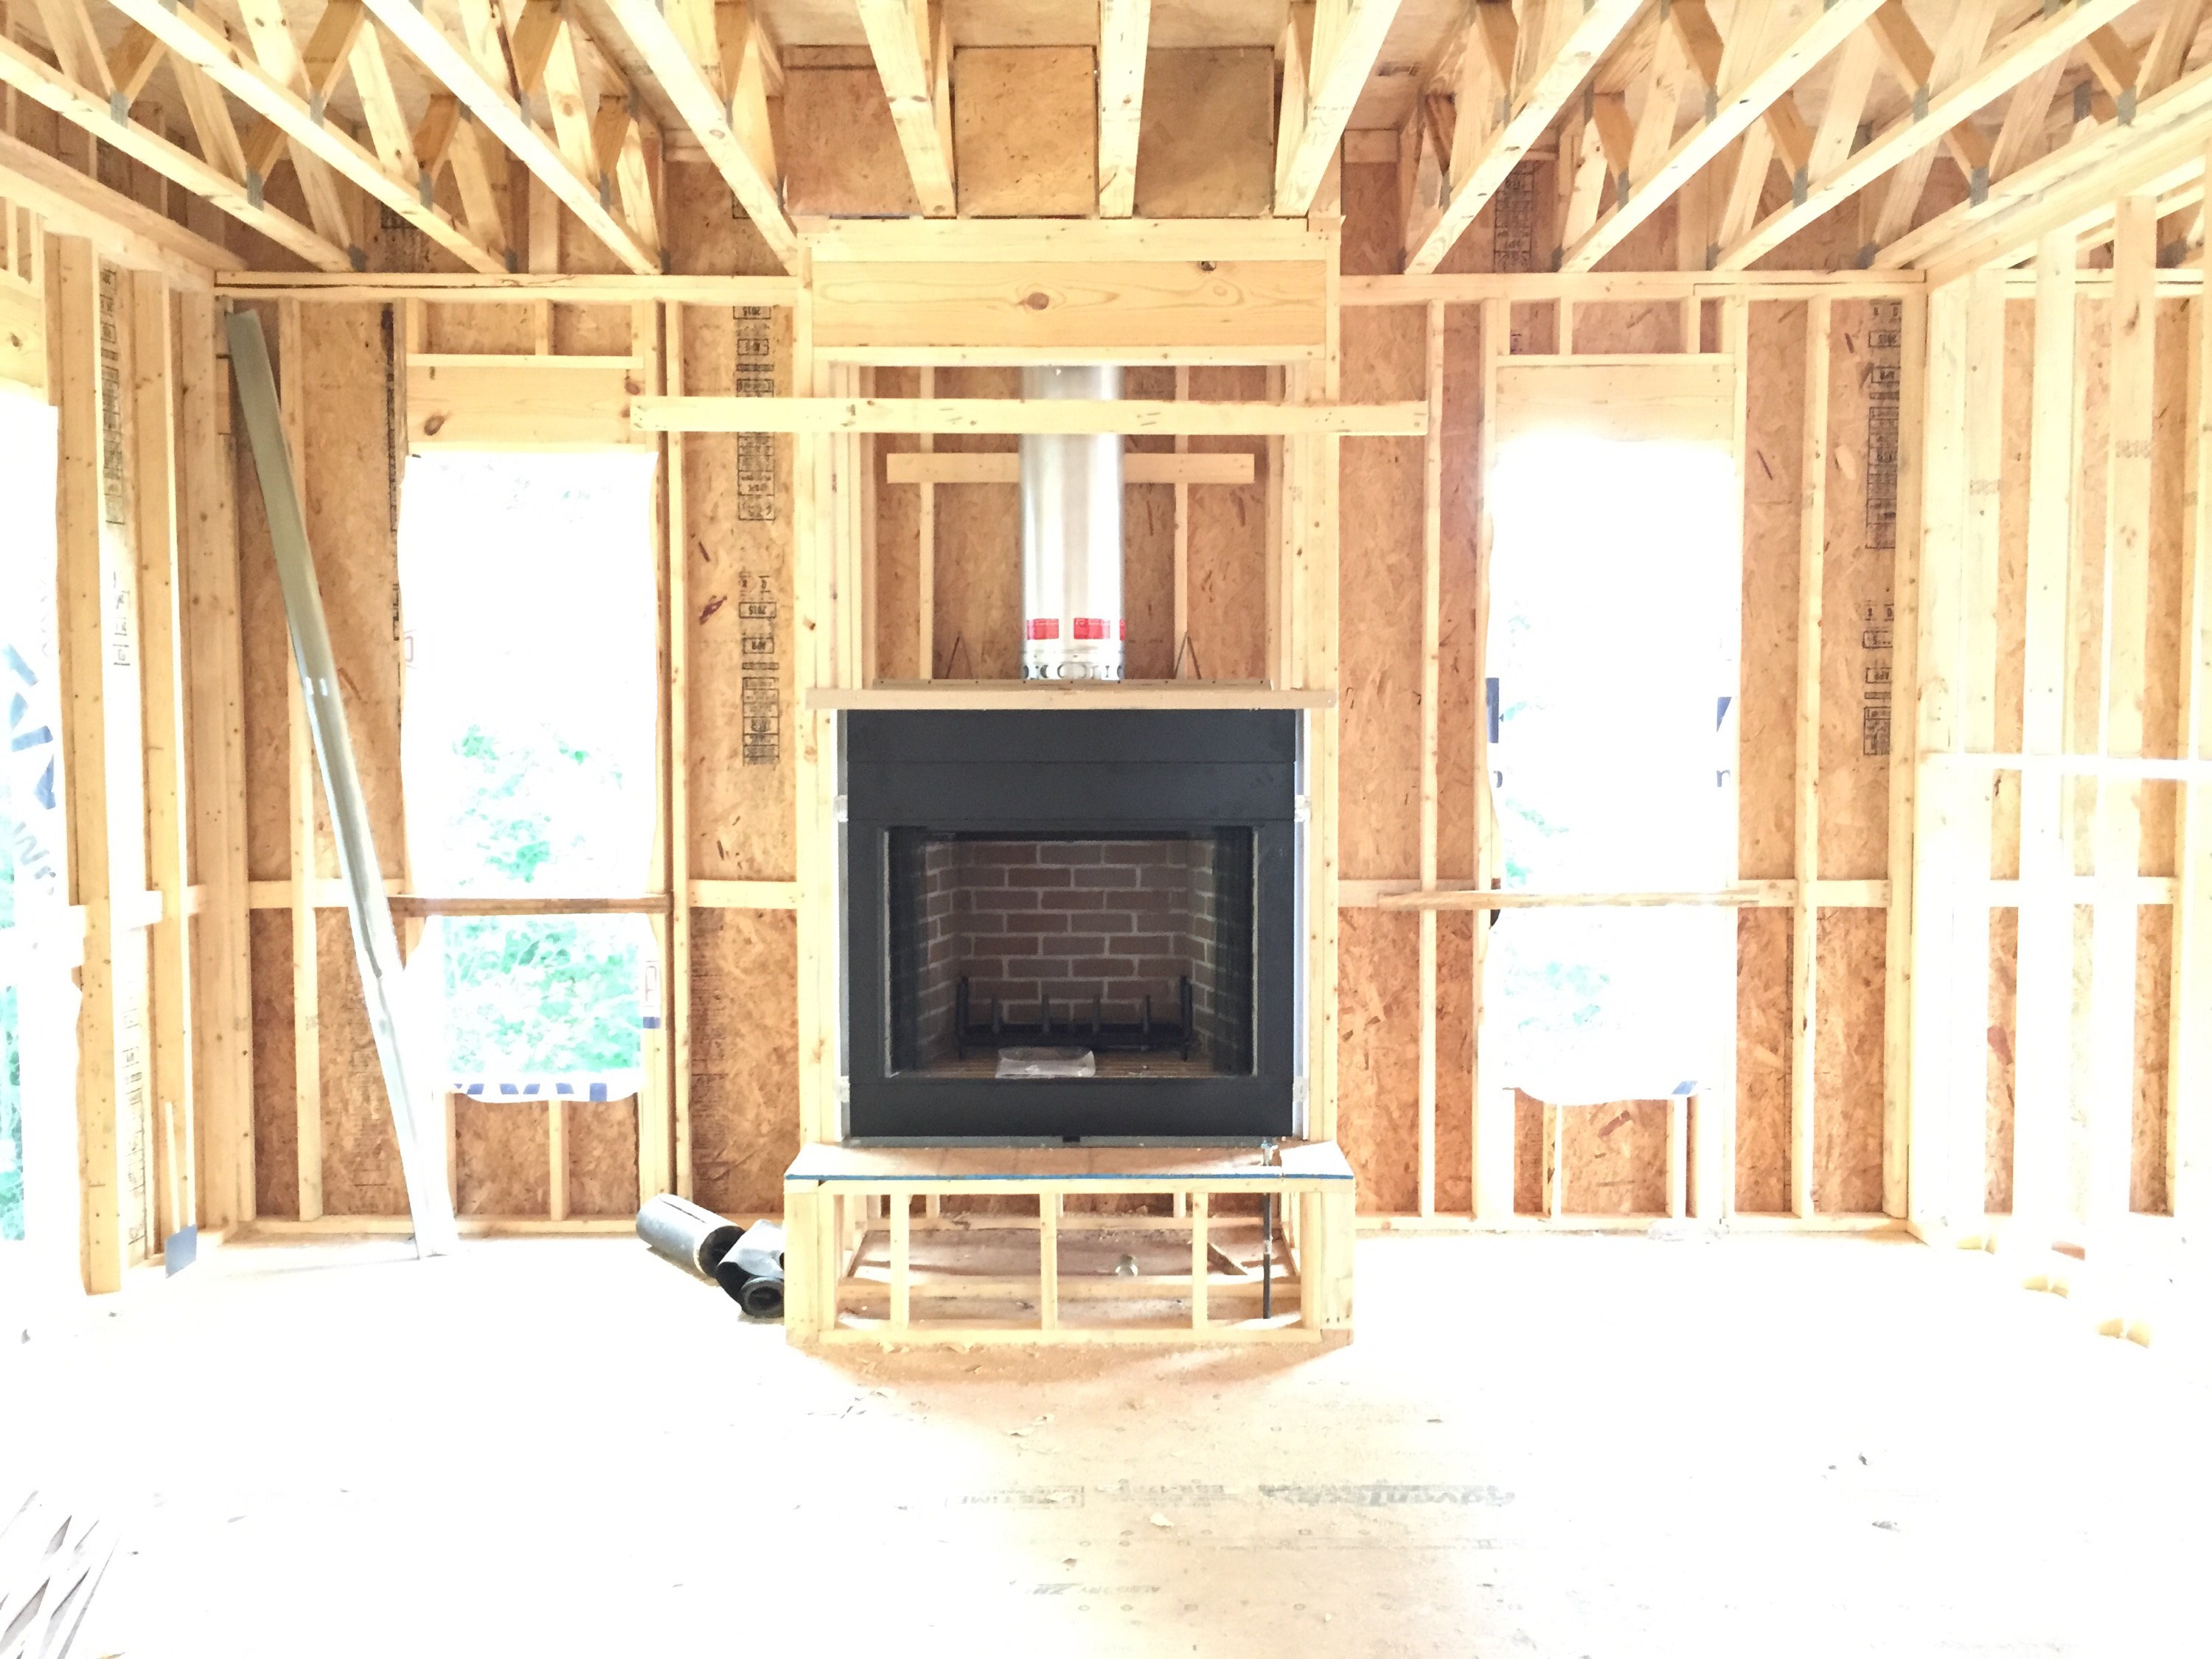
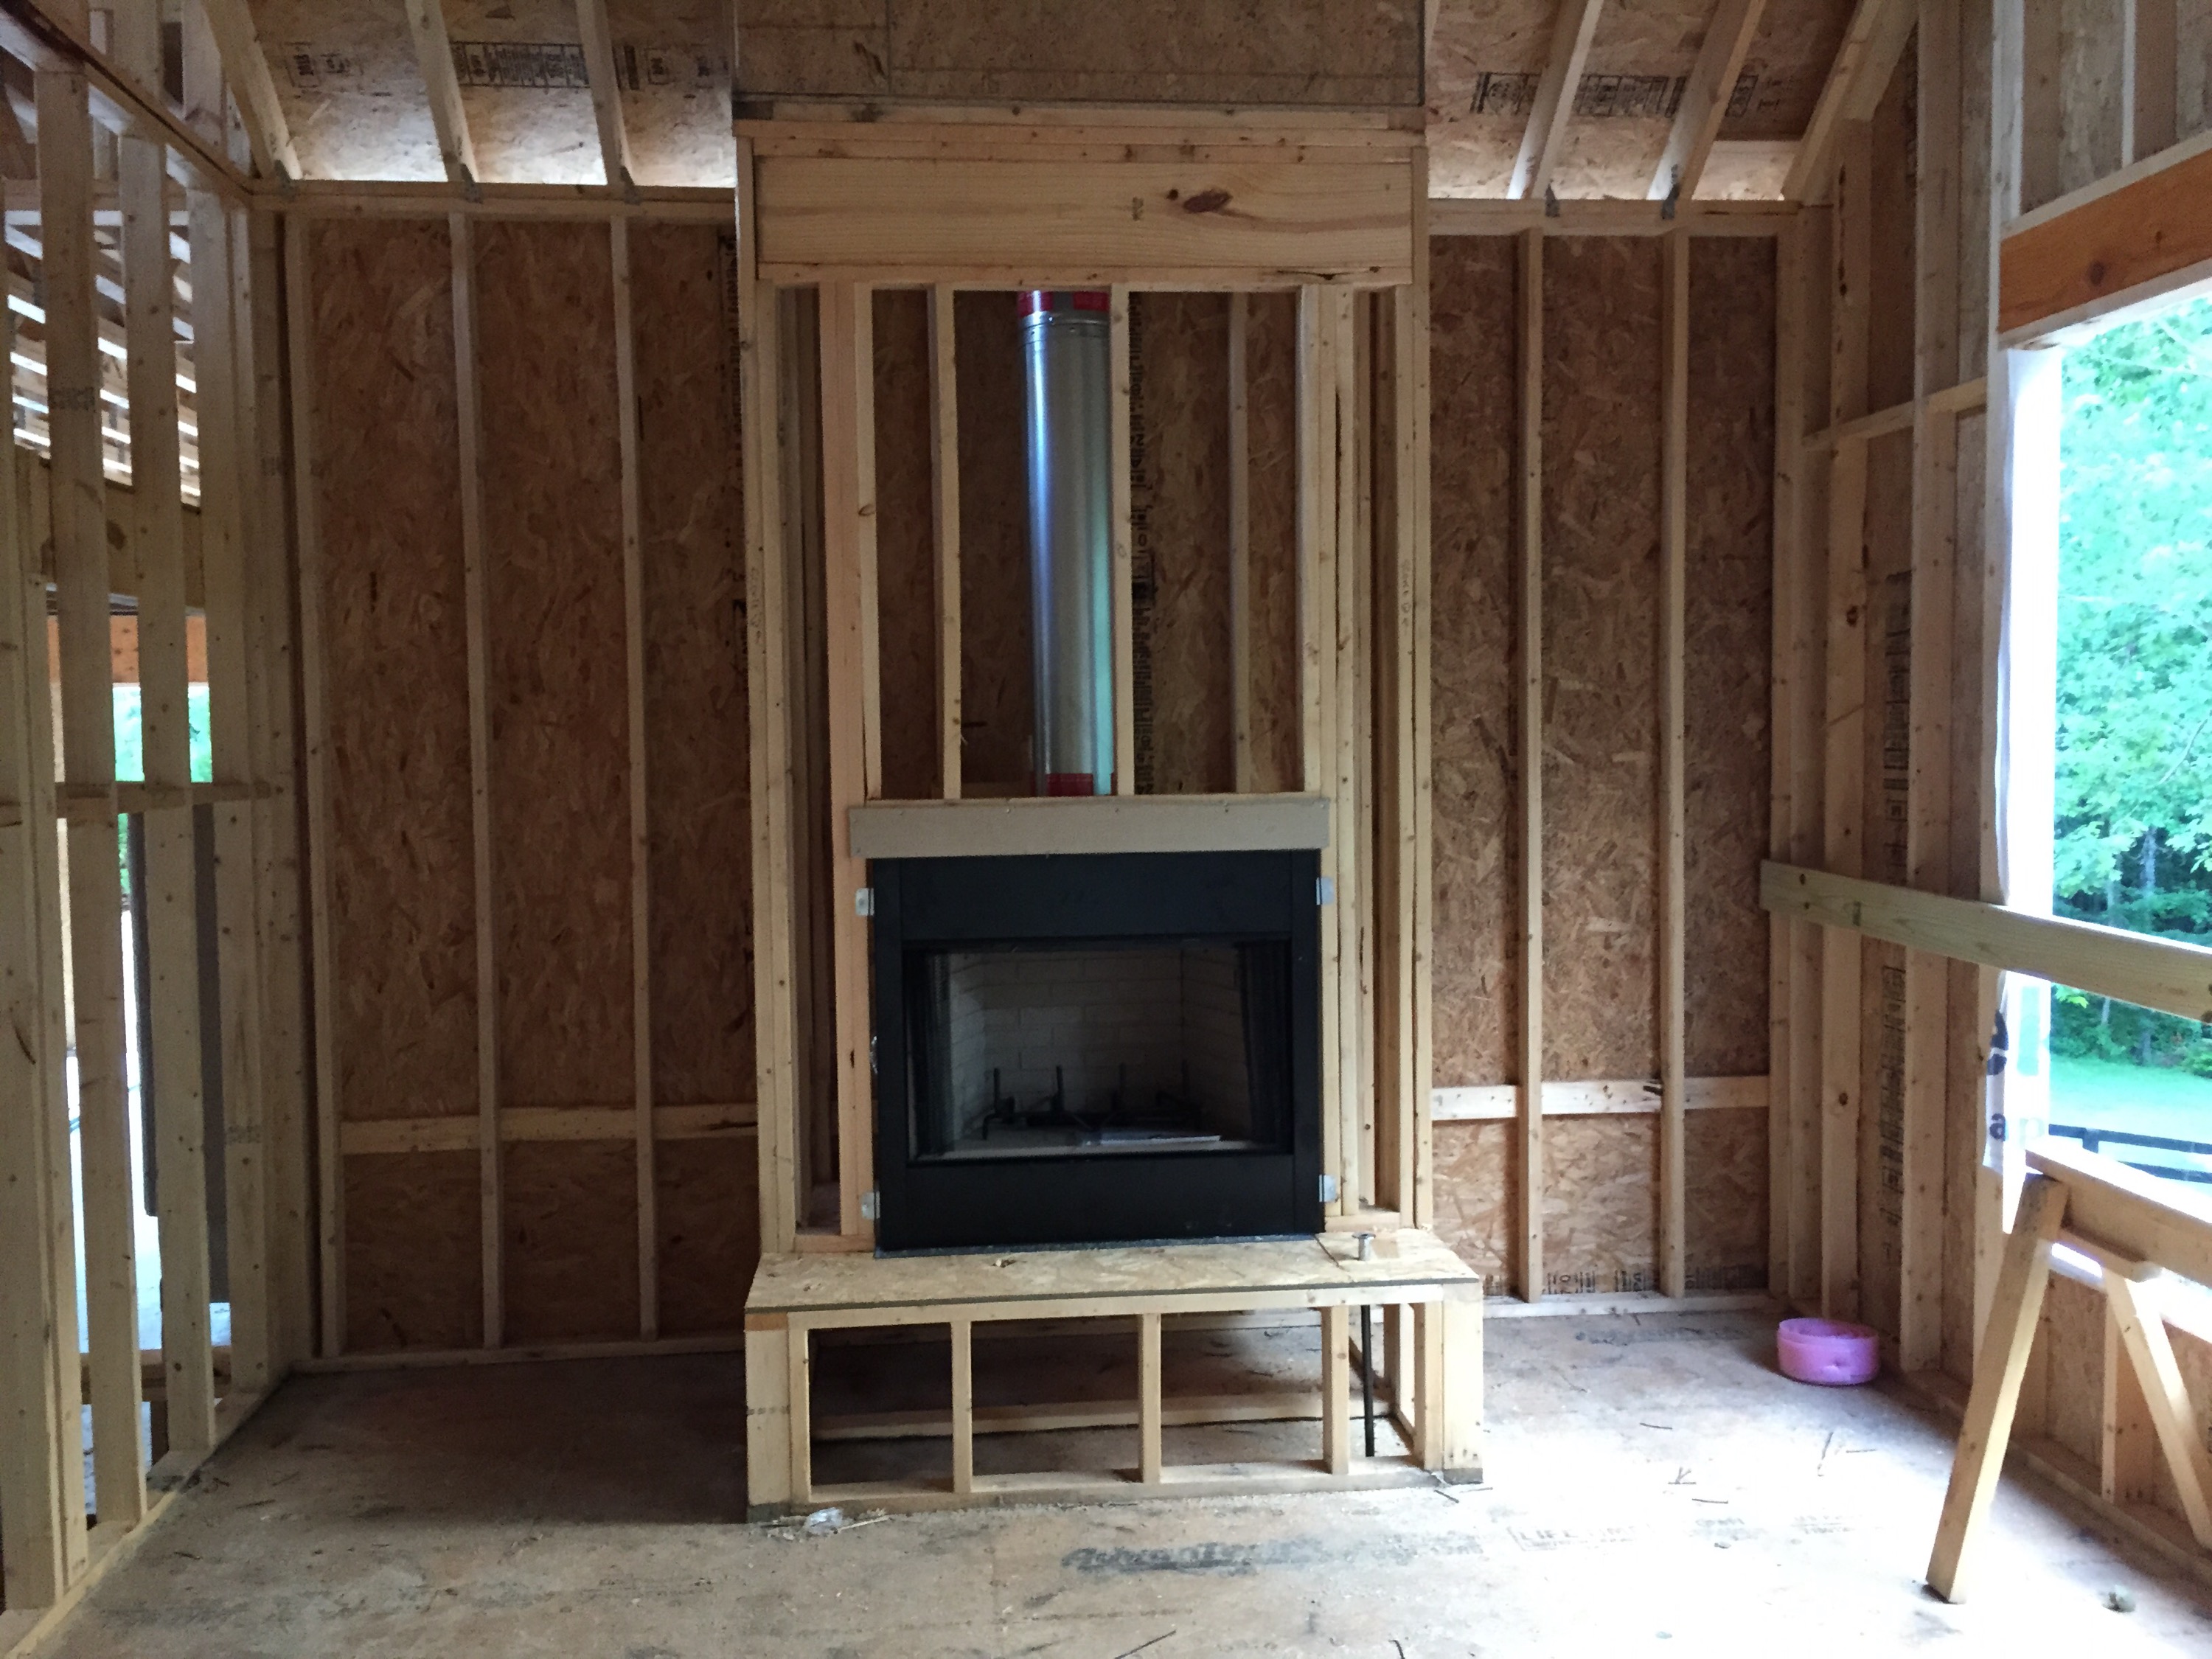
One of the unexpected decisions we had to make more quickly than we expected was the sizing of our fireplaces. We had actually gone to the fireplace store and picked out what we wanted, but the message never got back to the builder, so it didn’t make it to the contract. We thought that was the case, so we weren’t too surprised when we heard that the ones we picked out were about a $1,000 for both. Not wanting to hold anything up, I went to the fireplace store that day to see if it was worth it.
After much studying, I didn’t think it did. The upgrade was a 8 inches taller, and we have 10ft ceilings, so I wanted to make it happen, but I couldn’t justify the extra.
We went into the weekend thinking we were going with the standard. Little did we know that the we’d find the deal of a lifetime on almost all of our lighting, and saved probably 1-2k from our lighting budget because of one big sale.
The nagging of a short, standard fireplace continued through the weekend, and based on the savings in lighting, we decided to go for the upgrade in the living room, but keep the standard in the keeping room. The decision was perfect in both cases. The bigger one fit perfectly in the living room, but in the keeping room it would have been too big.
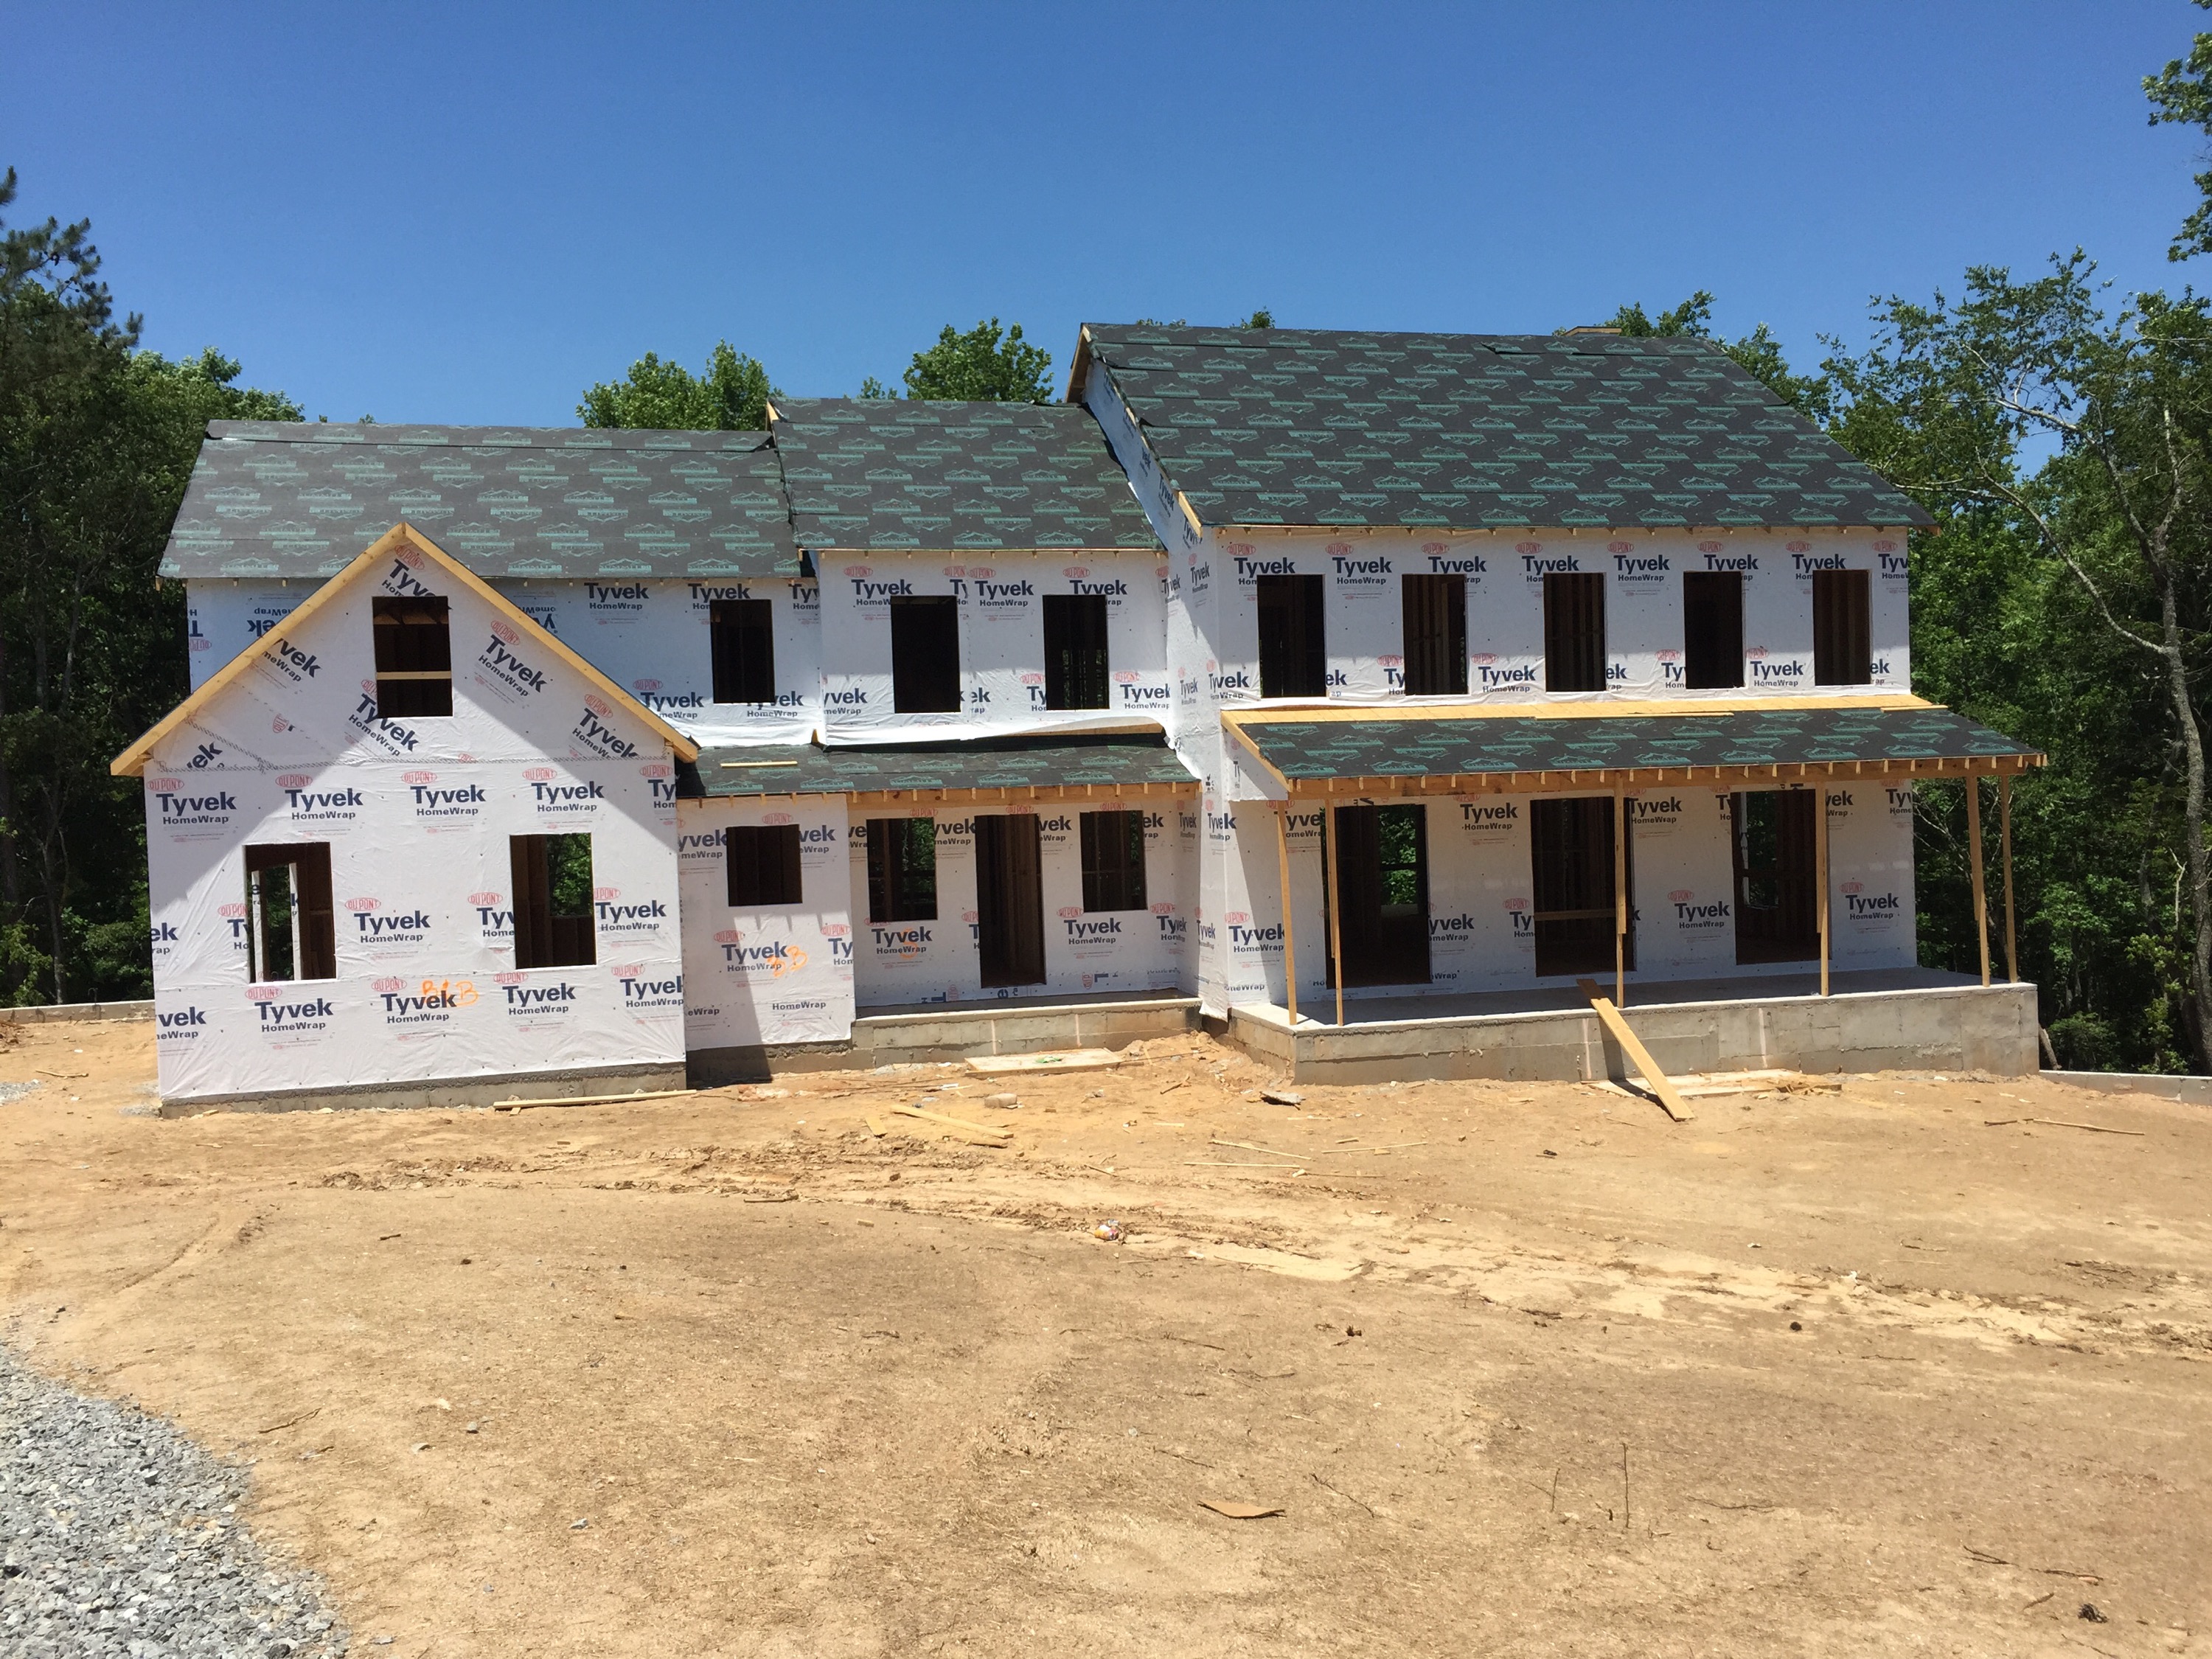
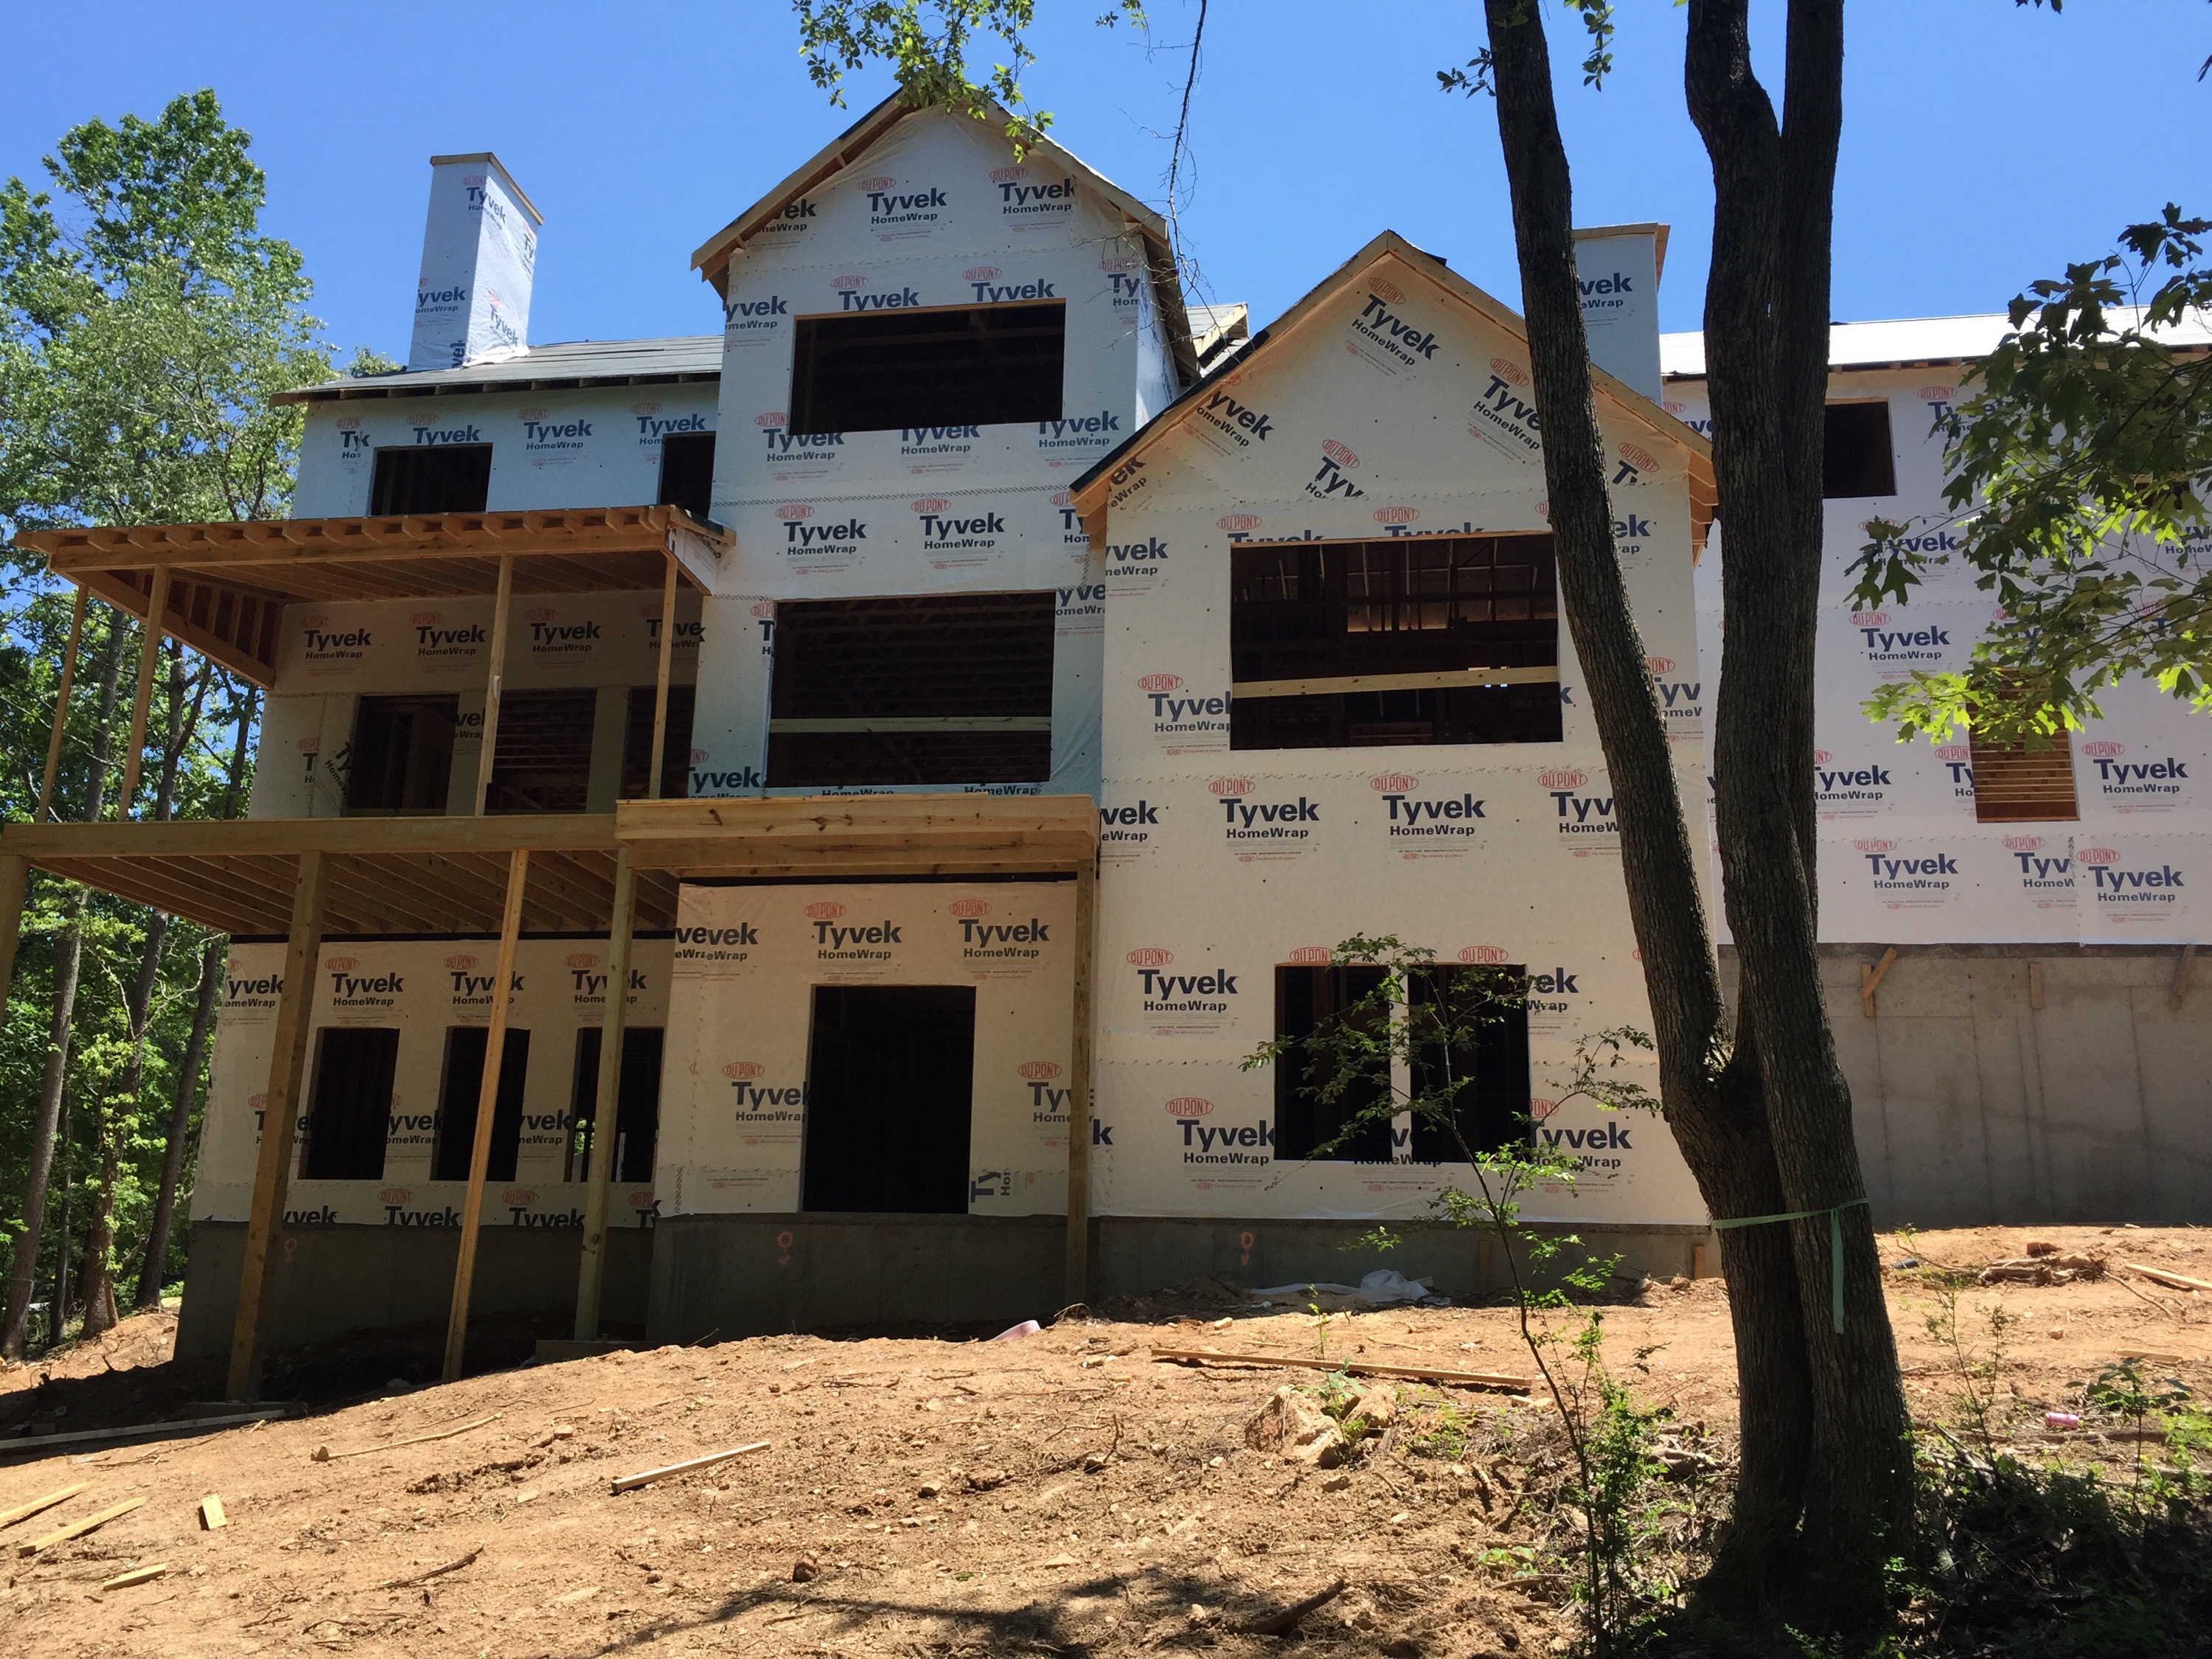
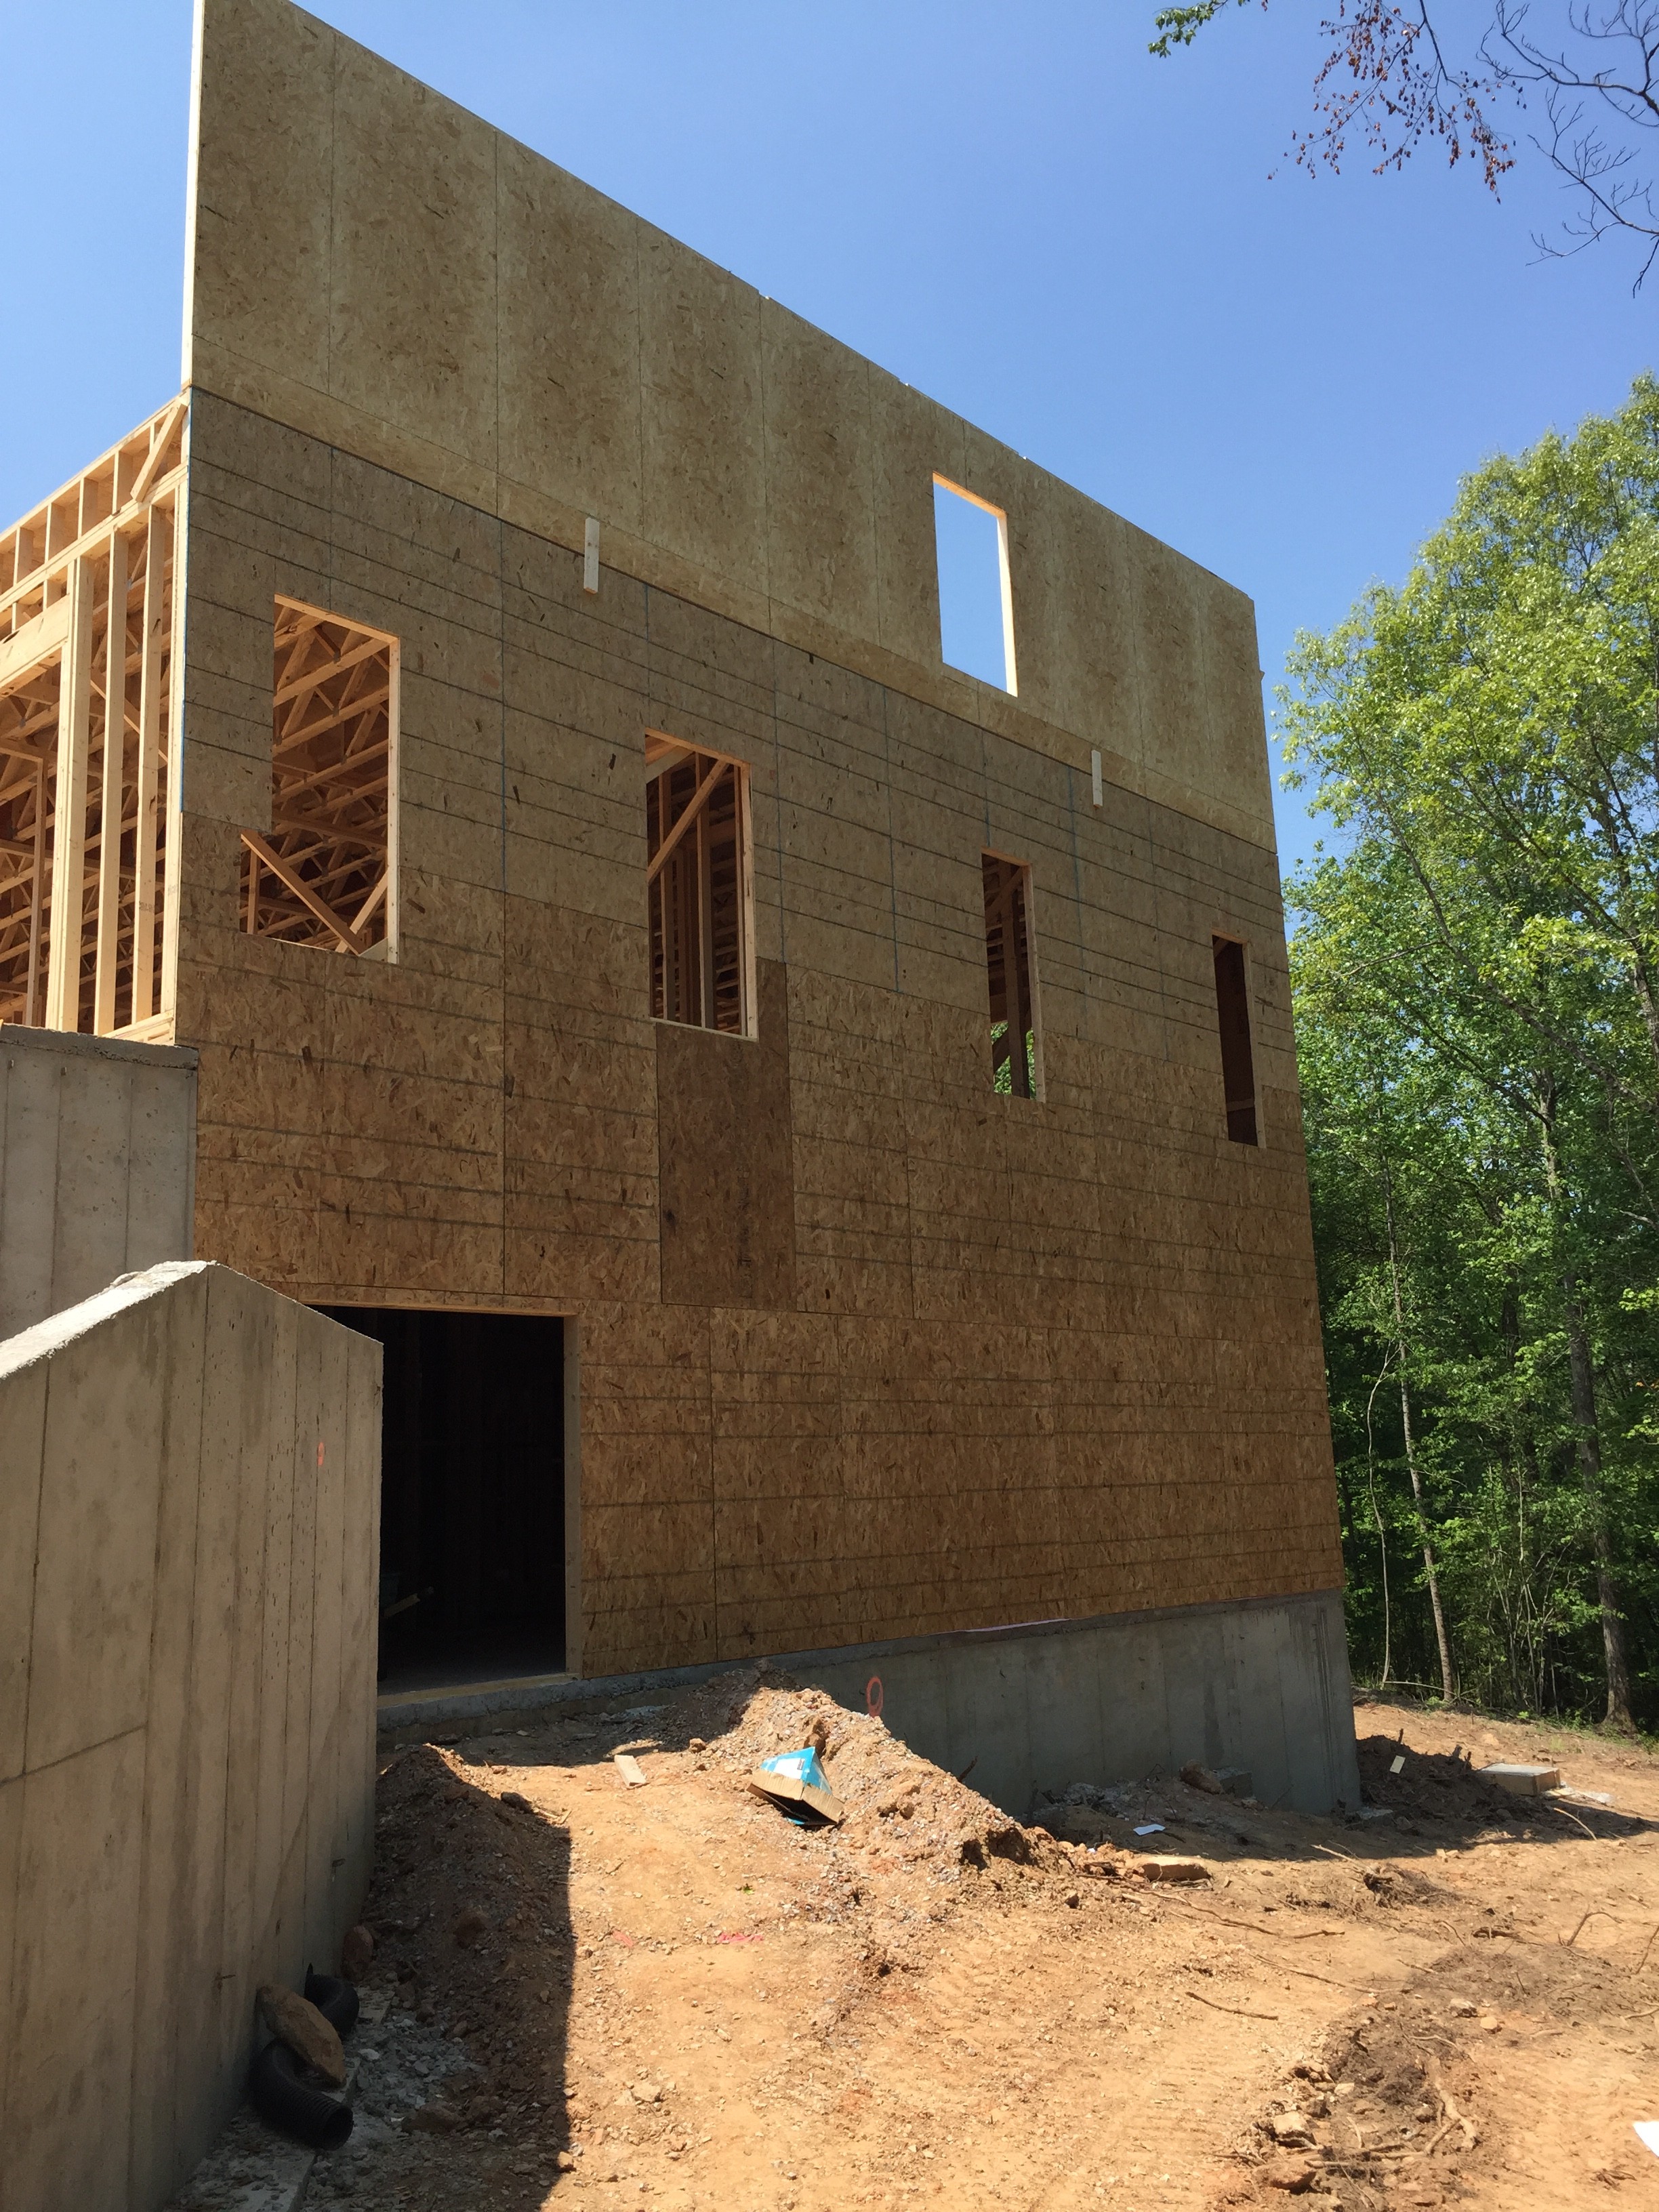
The super-fast pace of framing has slowed down now that the house is framed and wrapped. My builder tells me that the next three weeks will be the plumber, electrician and HVAC guy, then to drywall. It’s hard to think about having a drywalled house by the end of June, but that’s what it’s looking like here at the end of May.
We’ve had a couple of big developments this week. One is we went to the house to do the pre-trade walk through. We met with the electrician, plumber and HVAC people to tell them where we wanted everything. The biggest questions come from the electrician who asks where everything should go, every light, every switch, every outlet. We have a pretty big house, but we were pretty prepared, and it still took two hours to walk through with the electrician. I think our extra electrical cost will be huge though, as we had gone under contract with a “to code” electrical plan with 24 can lights, and every 3-way switch and extra light or outlet is extra. This cost was expected, but we added a bunch of things, and I’m not looking forward to the cost coming back. They line item everything, so can take out anything we don’t think is worth it after we get the price back.
We also met with a low-voltage person, but I think I’m going to do most of the low-voltage myself, so there wasn’t much from him.
The other big development is in lighting. We’ve now pre-bought almost all of our lighting. There’s an outlet center for Progressive Lighting, and once a year, the outlet center does a big sale. This year it was 50% off the entire purchase, and the outlet stuff is usually already over 50% off, so we’re talking 70-90% off. We got several chandeliers (so cheap we’re even putting a full chandelier in our laundry room and on the back porch), and all of the stuff that you feel like should be inexpensive ($6 flush mounts, $20 3-light vanity fixtures). I’ll update the out of pocket costs page this week, but all in all, we are probably going to spend about what we budgeted for light, we’re just getting a lot more for our money due to this sale. If you’re in Georgia, it’s almost worth timing your build around the Lanier Progressive Lighting Outlet annual spring sale.
Reading other blogs and forums on homebuilding there seems to be a “stigma” to changing something in your plan. You get many lessons on, “Do your homework up front, and don’t make changes after you start.” Although I’d agree with the sentiment, I’d encourage anyone building to do as much homework as possible to get as much in your contract as possible (especially where finishes are concerned. We shopped for (and bought some) finishes 6 months before we signed our contract), but I’d encourage everyone to set aside some amount of money specifically for changes…not upgrades, not the “emergency fund”, but unexpected items that come up, and you want to change. If you have a bit of this budget, you can maximize the potential of the home for you, and minimize your stress. We’ve made several changes that I’m thrilled with, and can say definitely I’d be very disappointed were they not made.
We’ve had a several changes related to the slope of the lot. They were expensive, but they’d been hard to see during the design phase:
Increased the basement height from 9 to 10 feet. Our house is a little below grade, but we wanted to minimize the feeling of being “below the world” We didn’t want to pay the extra $3k without getting a feel for where the house would sit. Once the lot was cleared, it became clear that an extra foot in height would make a major impact to the feel. With the extra foot, the house almost feels at the grade of the road (it’s about 3-4 ft below).
Removed more trees. We needed to physically see how much around the house was cleared before we were confident we needed more. We did, and now it’s great $1,500.
Added a retaining wall and double door to the side of the basement. Our lot slops pretty heavily from front to back, and it wasn’t until we were digging the basement that it became clear that instead of a natural slope from front to back, our front yard and house would look a lot better if we put a retaining wall off the front corner. This is going to be really functional as a direct entrance to my shop, and it really helped give a more gentle slope to the front yard. This change was $600, and probably the most worth it. This was going to be a natural slope from front to back, but we added the retain wall and door.
There we also had a basement door that needed to be moved because of the slope of the lot. It made much more sense to have to exit more in the middle of the house because of the slope, instead of closer to the side you see in the picture above. This one was free.
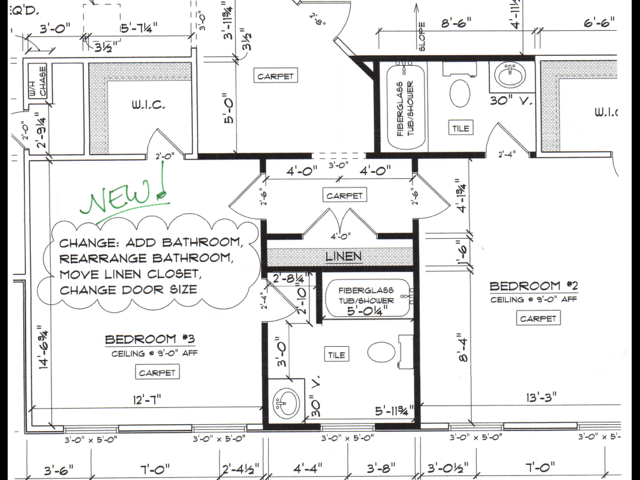
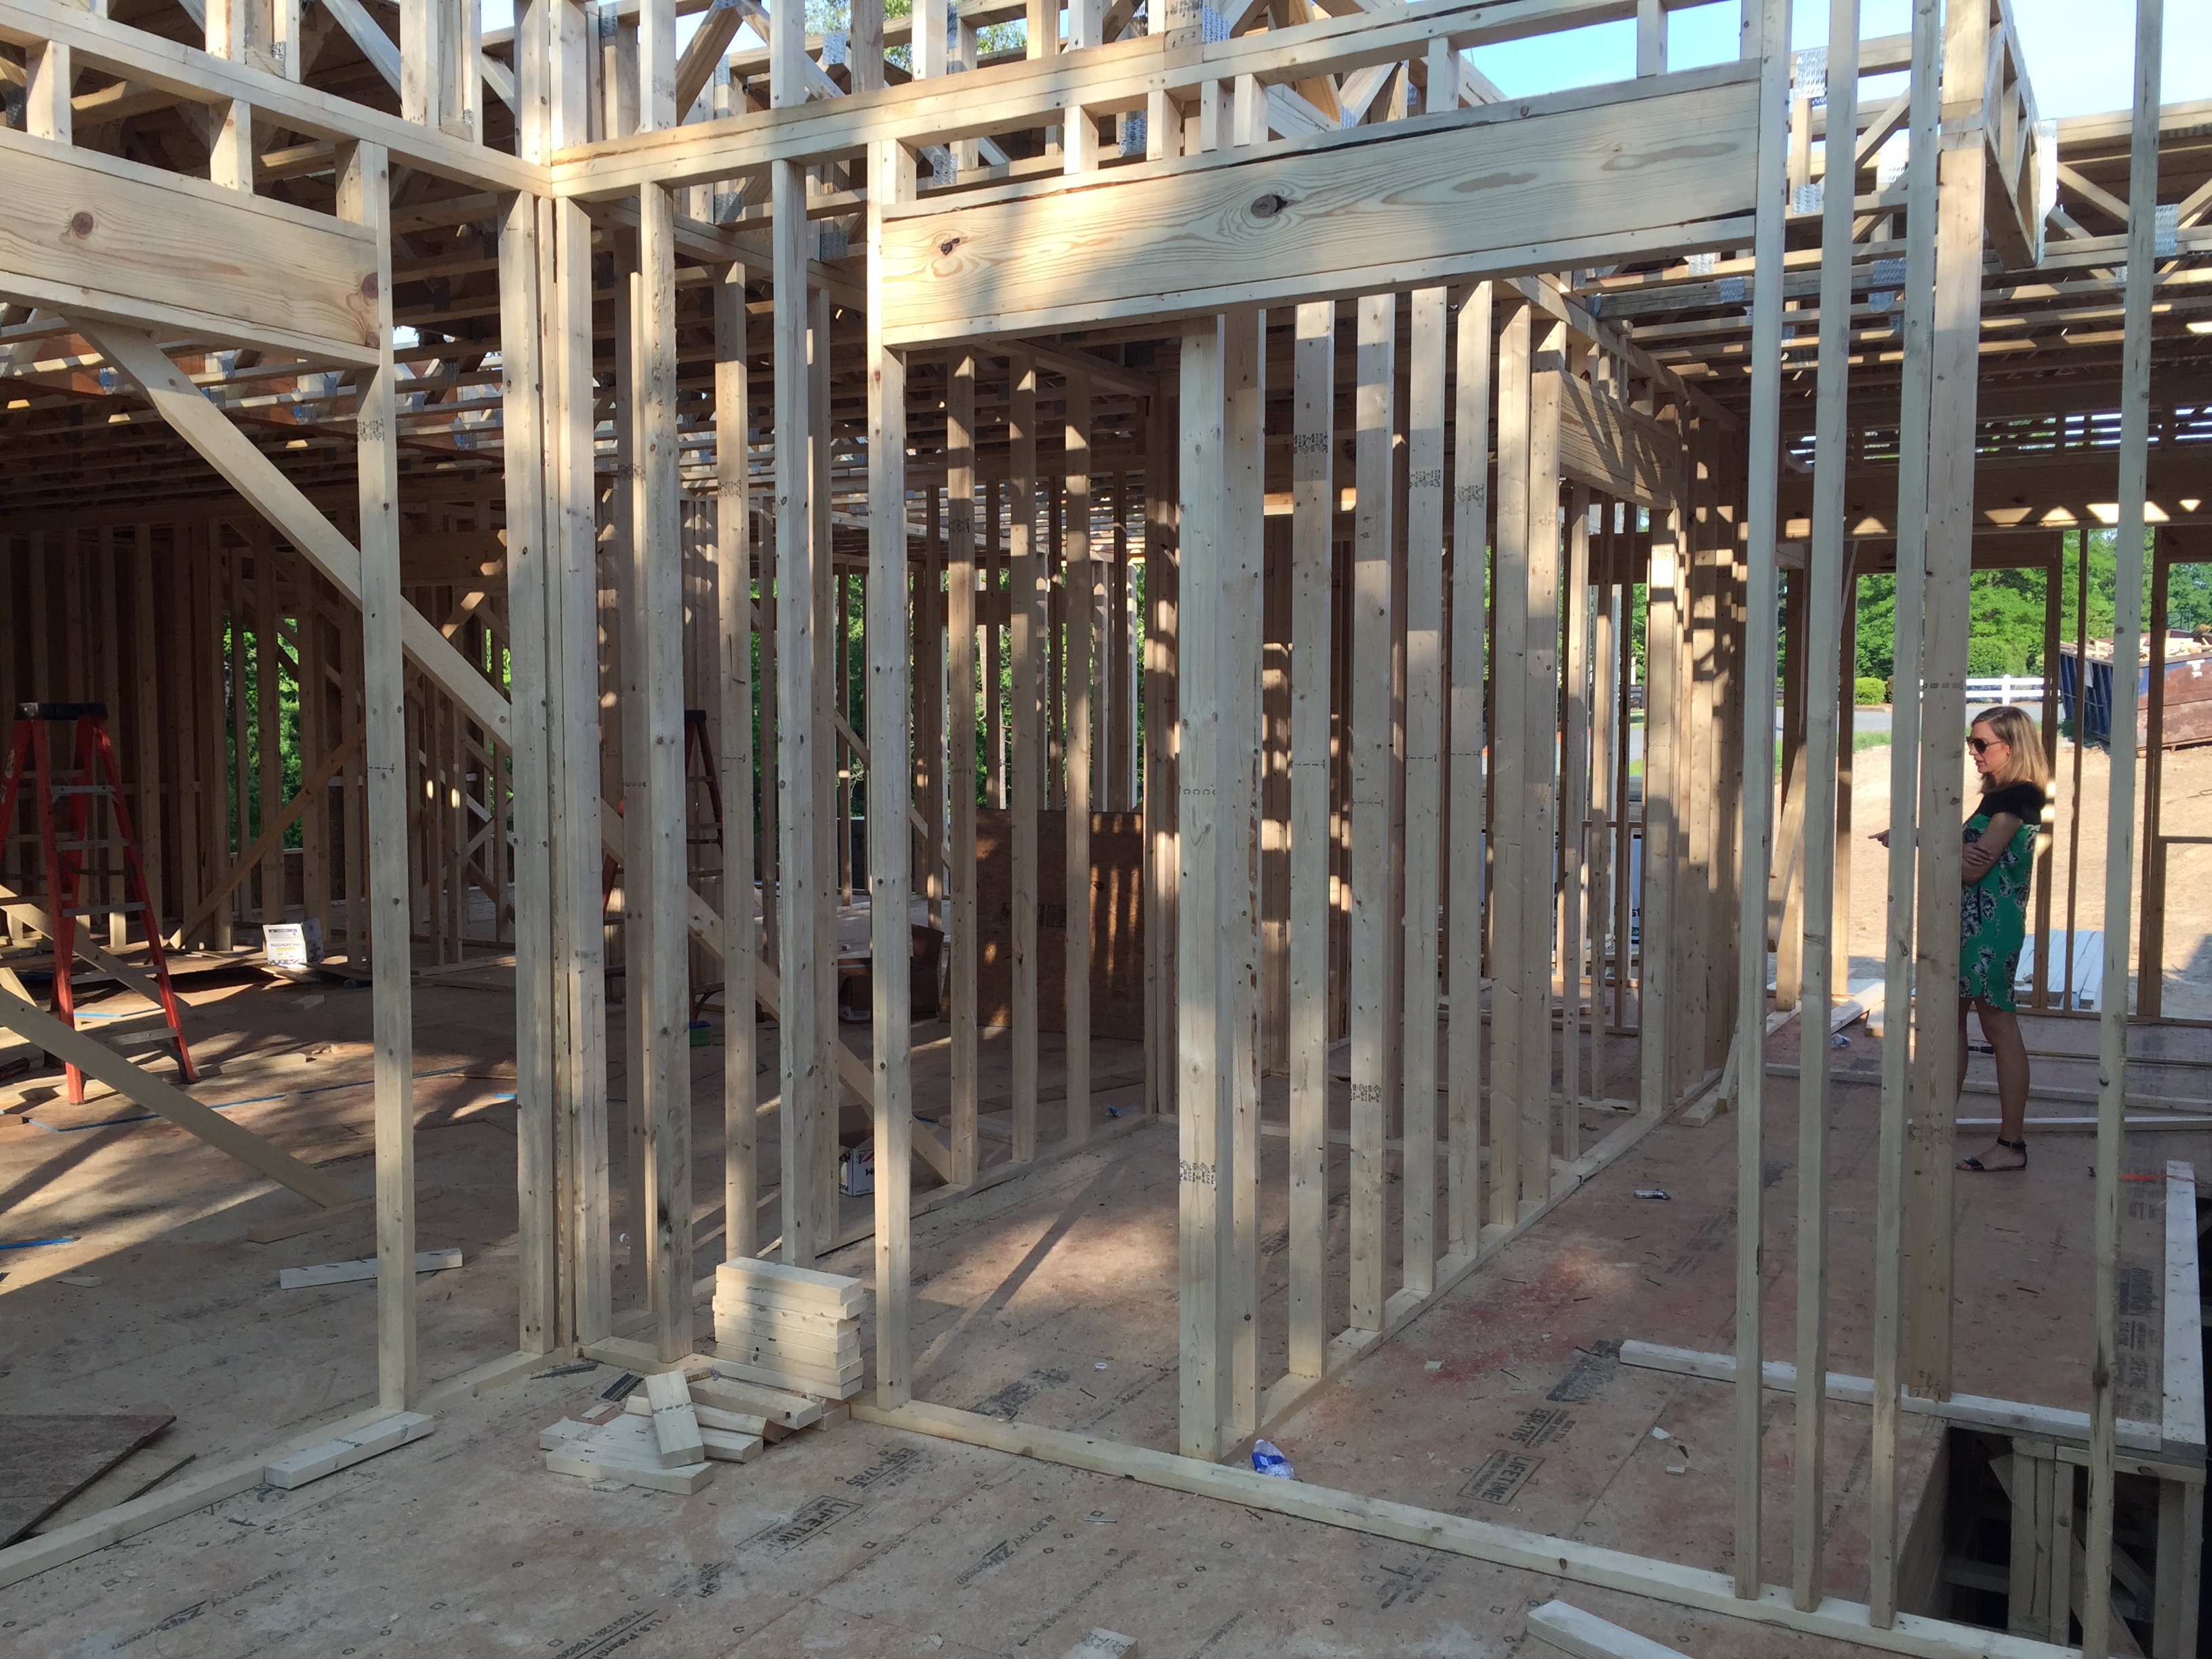
We were about to start the framing stage when we really re-thought our bathroom layout. In our plan we went under contract with, we had a full bath and half bath on the main level. The full bath was off the formal living, and it was absolutely redundant and unnecessary for us. You could convert the formal living into a bedroom, but it’s in the front of the house right next to the front door, so it’s a very bad place for a bedroom. Regardless, we knew we’d never use it as a bedroom. We also had a Jack and Jill bath upstairs for our girls. Although that was preferable for our family, most of the neighborhood homes have full suites in the bedrooms. So to save on the big change it would have cost to add another bathroom upstairs, we traded the downstairs bath (now a closet, but can still be converted easily since the basement is accessible) to remove the Jack and Jill and give both the girls a bath. Now that we’re done framing, we’re thrilled, as we used the upstairs space much better, and it’s a much more useful space for a bathroom. This one cost more $400, and it’s worth it!
Before. Notice the wasted space in the hallway. Much better use converting that hallway into a bath.I guess the moral of my story is don’t avoid changes because of your pride, “I said it was going to be this way, and by golly it will!” Of course budgets need to be protected and reality sets in (there are several I would have liked, just don’t want to spend the money).
I’m keeping a running total of my Out of Pocket Costs here.
One final note, if you’re trying to decide if building a custom home is for you, give some realistic thought as to your stress/frustration level of writing a check for 0.1-0.5% of your build cost for something completely unexpected and unavoidable. You will write many of those, whether your the best planner in the world or not, and if that stresses you out, you probably ought to consider something else.
The roof, the roof, the roof is on fire. On Tuesday they rented the giant crane, and 4 hours later, we have a roof. I have always heard that the framing stage feels fast. I can say with confidence that it doesn’t feel fast, it is fast! You can see where they were at the end of the 1 minute time lapse below. That was Tuesday at noon. It’s Thursday evening, and the whole thing is now clad in OSB and the front porch studs are in. It’s truly incredible how fast these guys work!
I weighed in a few days ago on a post over at GardenWeb/Houzz about ceiling height. Of course this is a personal preference and has a bit to do the sizes of the rooms in the house–smaller rooms can afford shorter ceilings and larger/longer rooms feel less tunnel-like with taller ceilings.
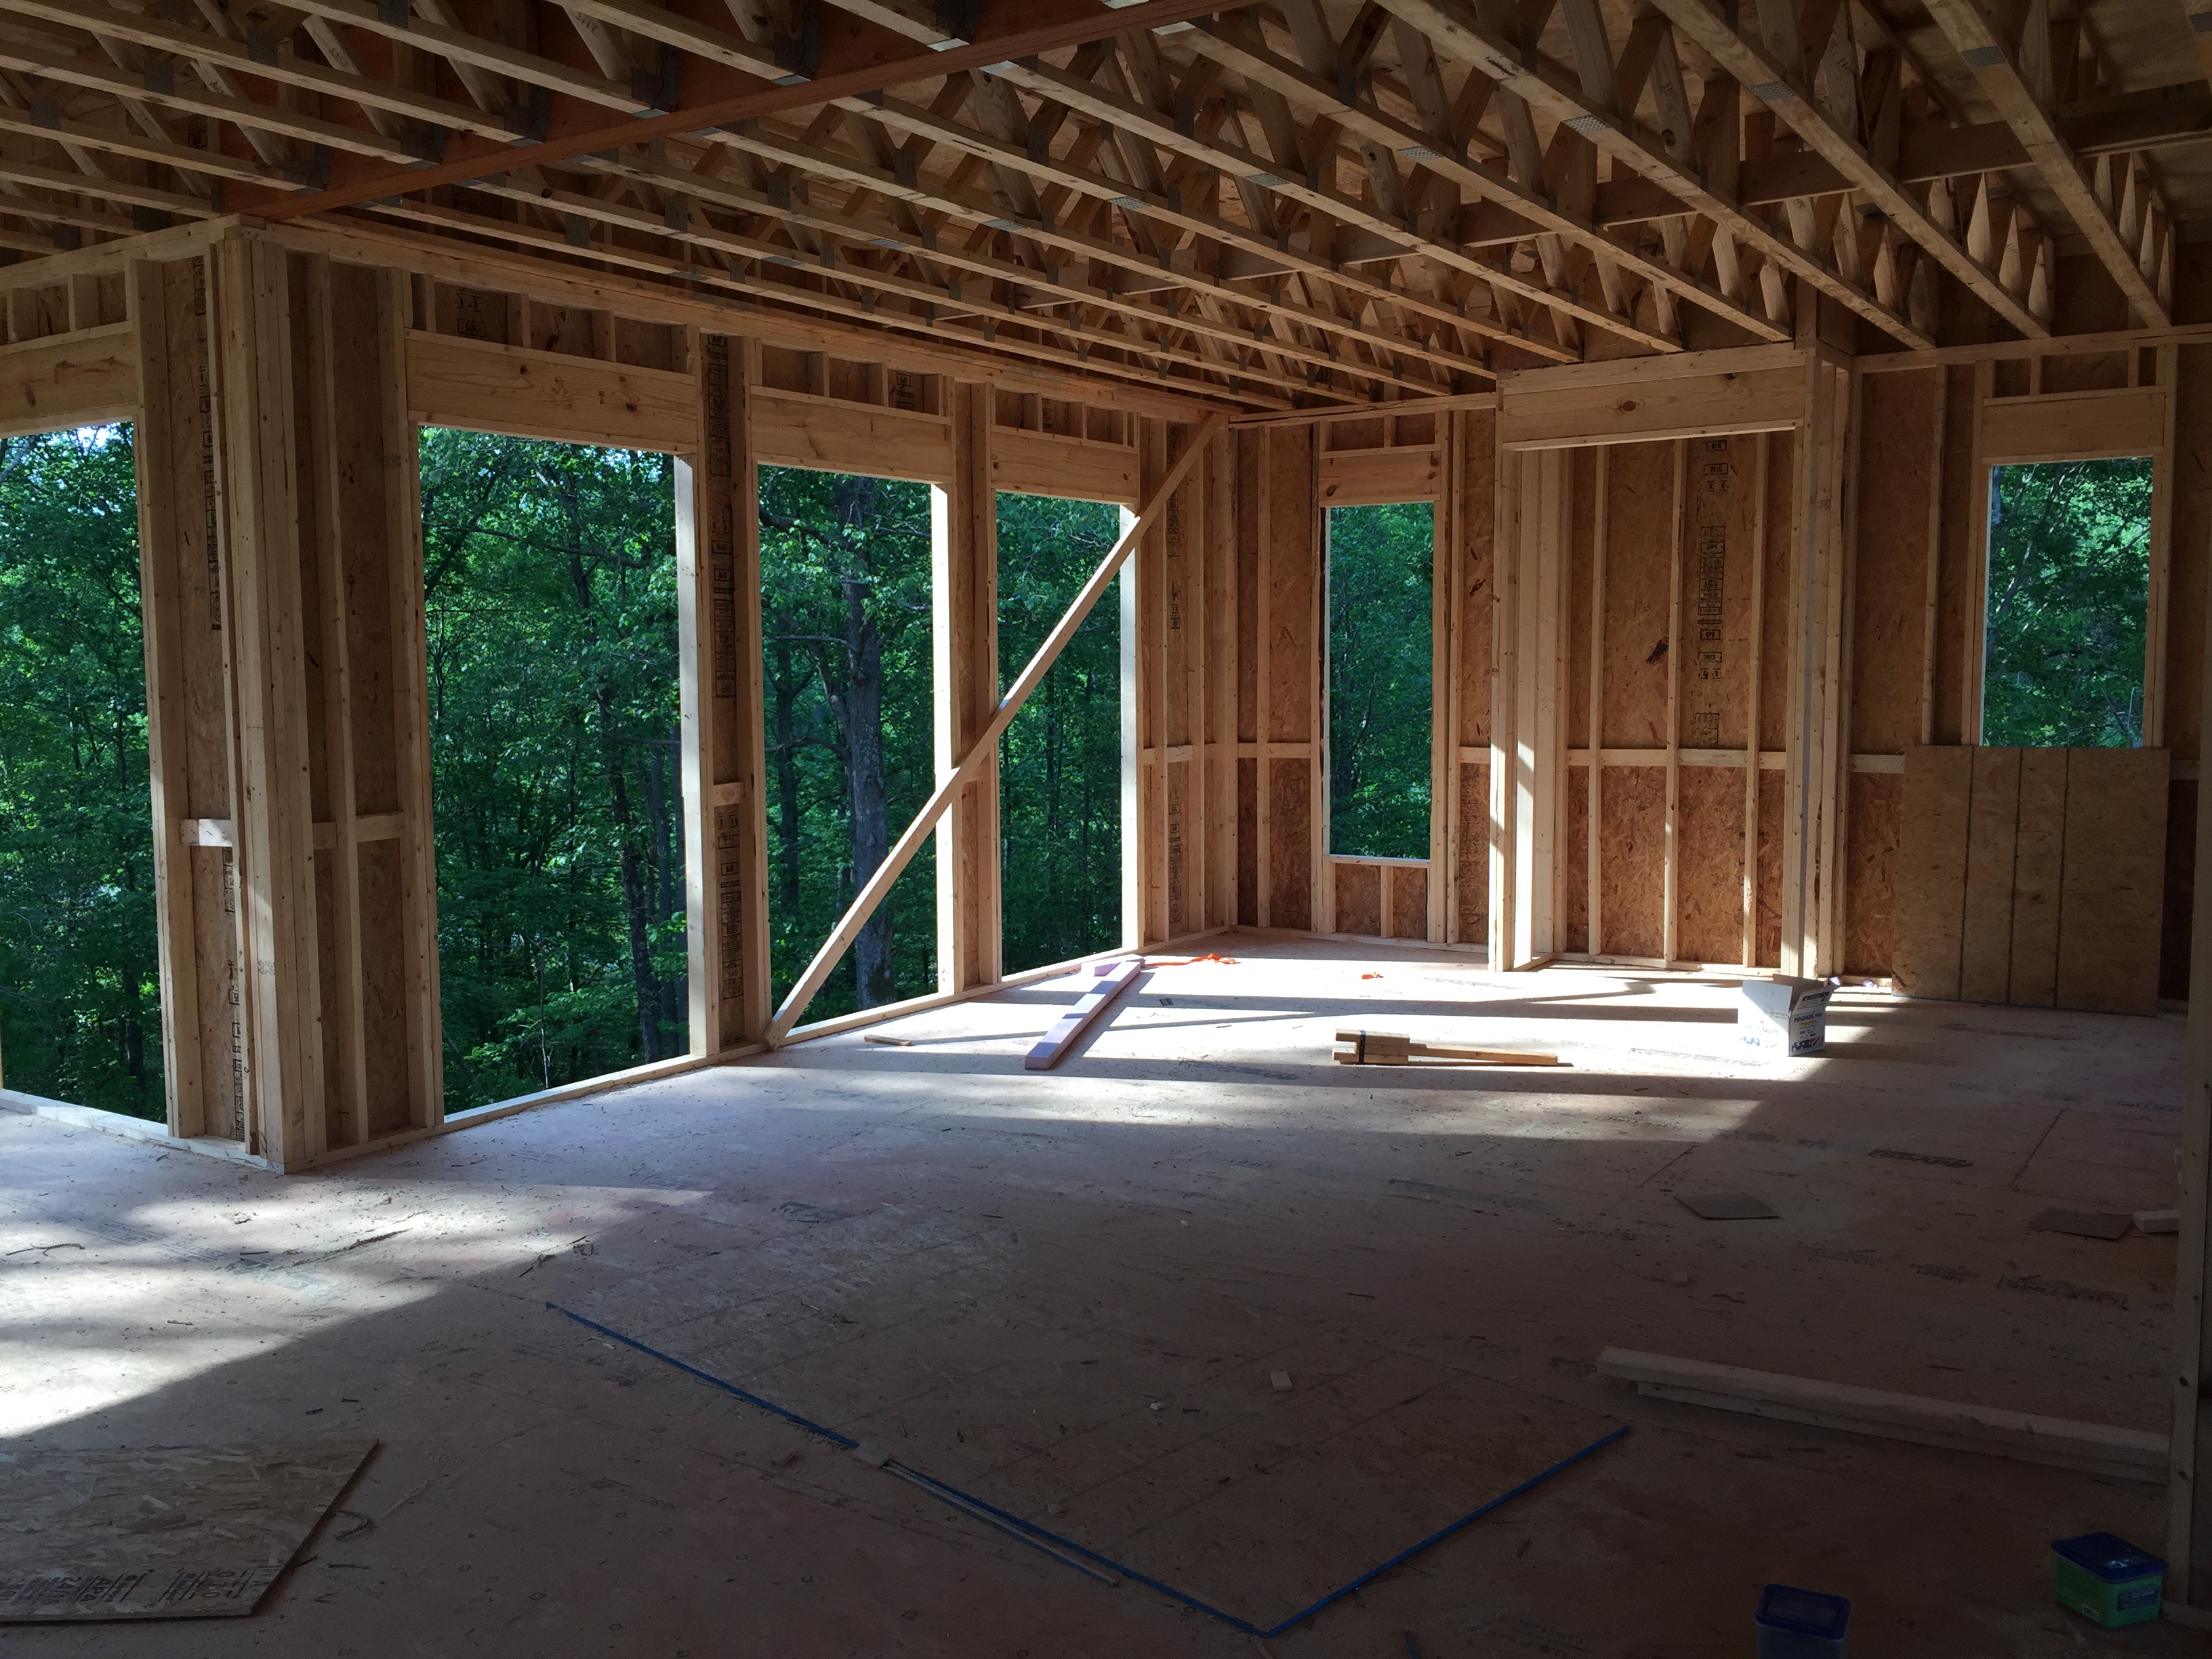
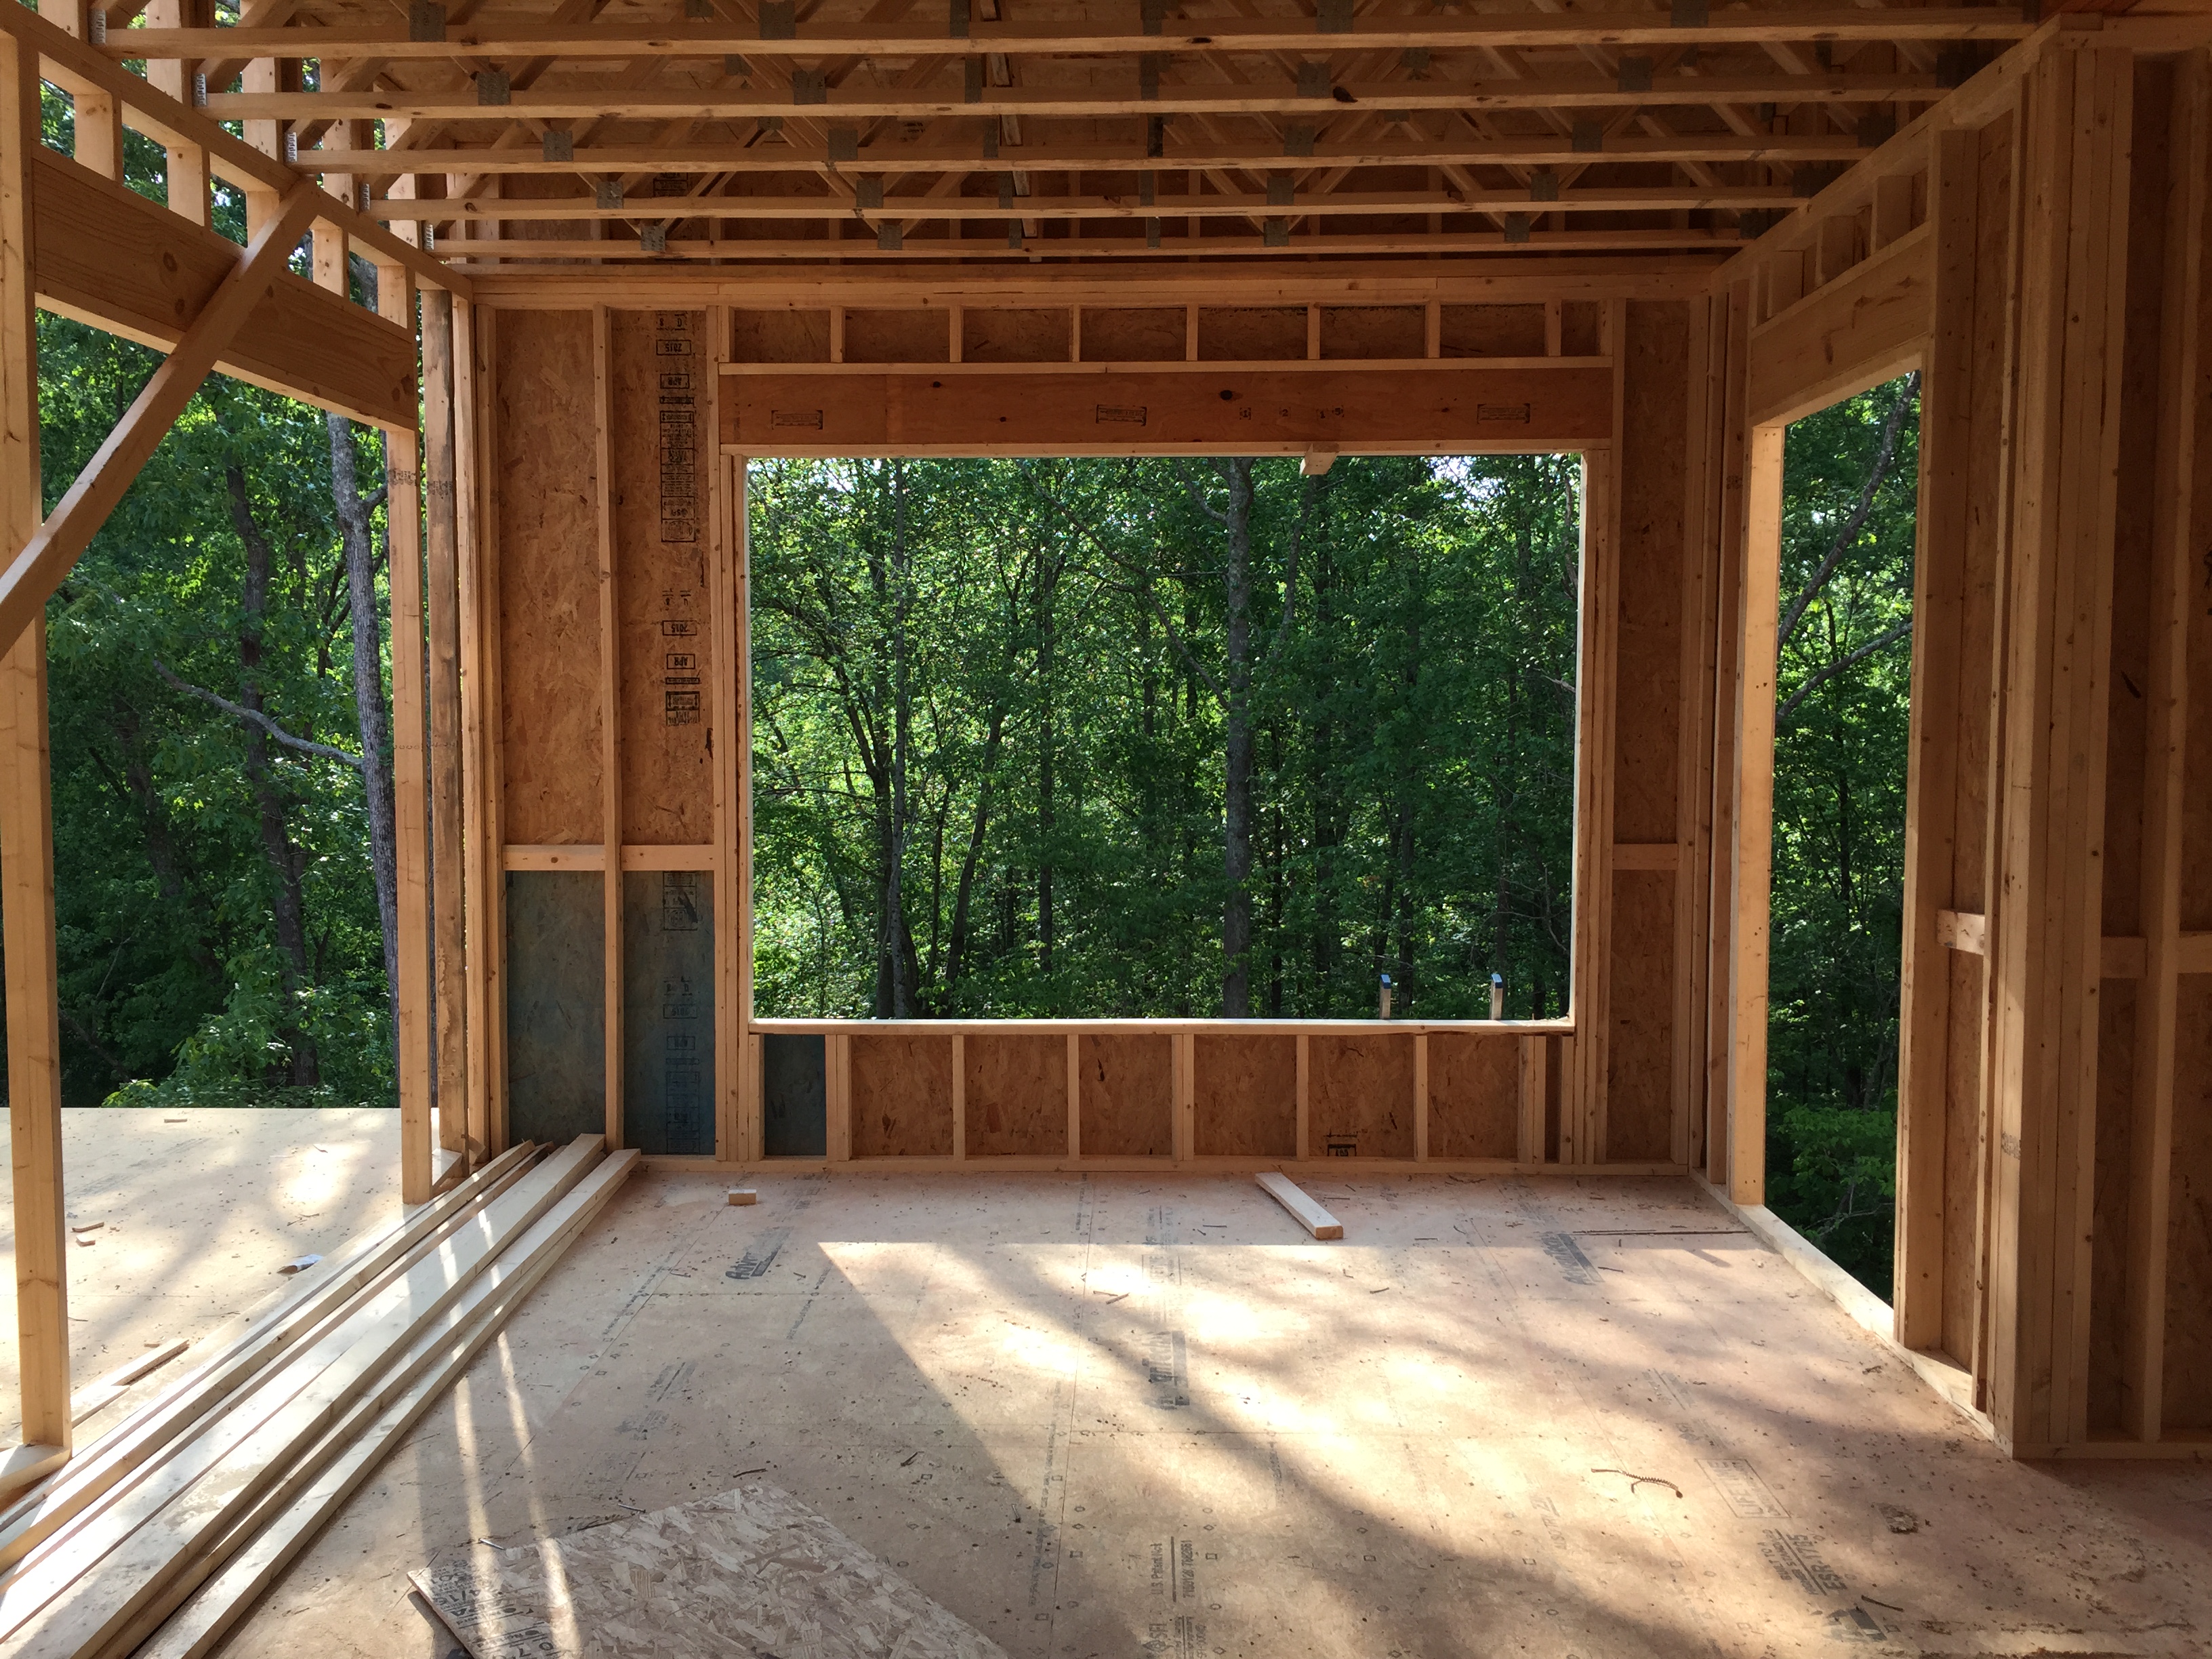
Our house plan was based on a local model home, and it had 10ft ceilings on the main floor, so we knew that’s the direction we wanted to go, but thought that we might consider 9ft if the budget came to it. 10ft was important to us because a lot of houses built recently in Georgia have the “2-story” livings/entries, and we hate them. They are impossible to heat; they make the upstairs impossible to cool in the summer because all the downstairs heat rises; they waste a ton of space; and sound travels right up to the kids napping upstairs–all this to make the room feel “grand”. 10ft ceilings gives the “grandness” of 2-story without sacrificing all the things above, and to us, it also doesn’t sacrifice the “intimate” feeling of the rooms. It’s really the perfect solution.
This last week, I walked for the first time into our partially-framed first floor for the first time, I’m thrilled we held firm to 10ft ceilings with 8ft doors and 6ft windows. The 10ft feels nice, of course, but added with the scale of the larger doors and windows, I think it’s my favorite feature of the house. It’s hard to communicate in the pictures, but the oversized windows and doors are making this house what it is.
We thought this was a mistake at first, but we learned something after thinking for a minute. This is how you frame a pocket door.These doors are 8×4, so they’re skinnier and taller than normal. The windows are skinnier too, so these both look a little taller than even a taller 6ft window.Tall triple windows for the breakfast area. They are awesome.
It’s hard to communicate the feeling in these pics, but I’d just encourage you to do it if you’re thinking about it. As an aside, don’t do 10ft ceilings without the upgraded doors/windows. Our basement is 10ft by necessity, and we didn’t do the upgrade to the taller doors/windows there, and it doesn’t feel nearly as nice.